
IP Address Class consideration
Class is in session.
Every so often I see organizations using Class C private IP address ranges . When I see this it makes me think that I’ve run across a company where the business was so successful they had no time to work through developing an IP schema.
I’ve had some growth pains in using a Class C range and with a new home-lab this caused me to spend some time to decide which Private IP range and class I needed. Since I’ve run into issues dealing with conflicting ranges using the Class A 10.x.x.x and my corporate VPN tunnel that range was out of the running early on. Class C was too many small subnets and plainly grouping them into a supernet was overkill.
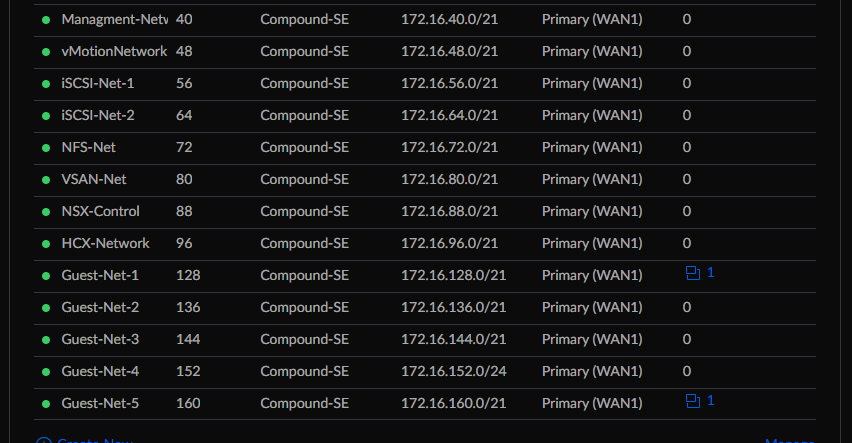
So, I chose to use a Private Class B network in my home network to allow me more flexibility in carving out various subnets. This will allow me to use a /21 CIDR block to carve up the 172.16.x.x network into multiple ranges. Some of these are overkill and some are possible future expansion that I wanted to have in for planning now.
IP Ranges
172.16.40.0/21 – Management Network – VLAN 40
172.16.48.0/21 – vMotion Network – VLAN 48
172.16.56.0/21 – ISCSI – Network 1 – VLAN 56
172.16.64.0/21 – ISCSI – Network 2 – VLAN 64
172.16.72.0/21 – NFS Network – VLAN 72
172.16.80.0/21 – VSAN Network – VLAN 80
172.16.88.0/21 – NSX Control – VLAN 88
172.16.96.0/21 – HCX – VLAN 96
172.16.128.0/21 – Guest Network 1 – VLAN 128
172.16.136.0/21 – Guest Network 2 – VLAN 136
172.16.144.0/21 – Guest Network 3 – VLAN 144
172.16.152.0/21 – Guest Network 4 – VLAN 152
172.16.160.0/21 – Guest Network 5 – VLAN 160
Ubiquiti UniFi network VLAN setup with DHCP and DNS Options
In order to work with the above stated IP address ranges, I tore down my existing UniFi Networking setup and replaced it with a basic Default network (VLAN 0) configuration of 172.16.0.0/21 and this is where all of my networking equipment management IP addresses live.
In the UniFi interface under setup and networking I created multiple networks for various uses in my home network such as a separate IoT network and a Guest network for Wi-Fi and associated SSID broadcast. Along with two different networks for my house and one for my in-laws who live here on property with us.
Here is an example of the setup for Guest Network 5 using the 172.16.160.0/21 Network and VLAN 160
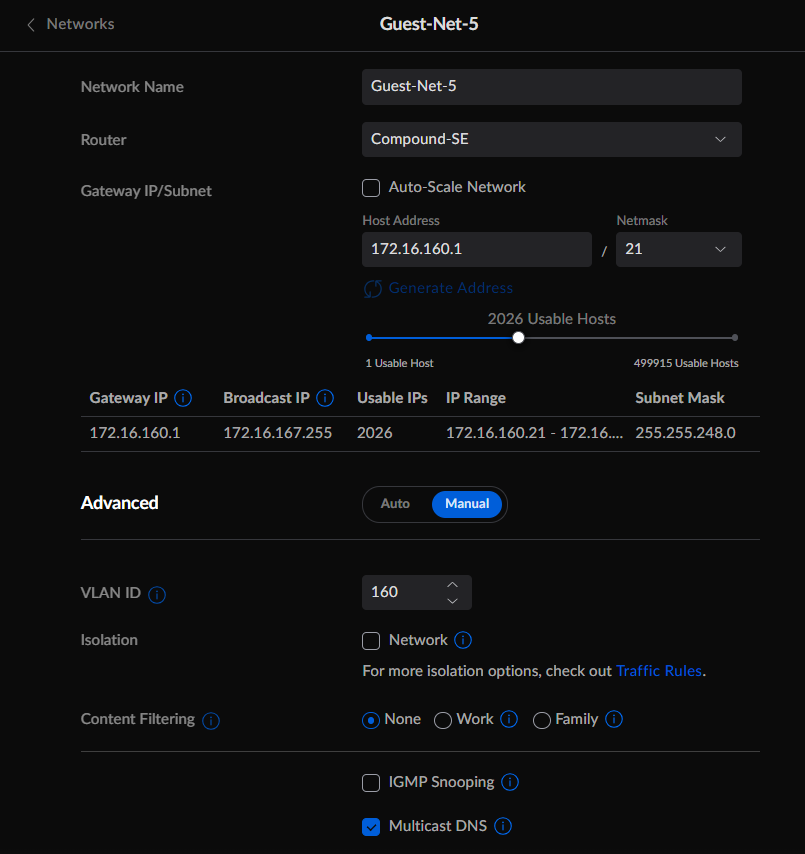
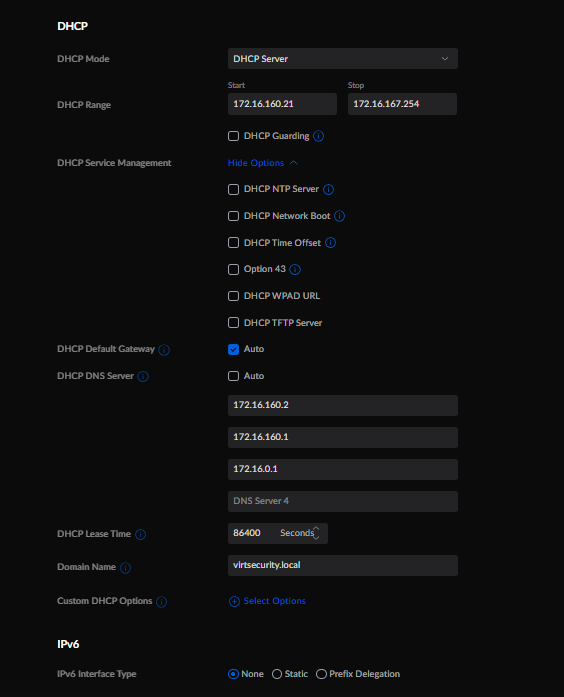
I setup the DHCP ranges with a very large block of IP addresses. I may alter this later as I start to build out workloads in these various CIDR ranges. In each network I added the Raspberry PI IP address on that network as a DNS server, the Ubiquiti Dream Machine SE (UDM-SE) IP Gateway address and the overall UDM-SE IP address as fallback DNS servers. Currently each IP address range is routable internally and can reach the internet. Eventually I will add Firewall rules that will restrict internet and intra-VLAN access. Currently this is not needed.
Here is a screen shot of the Networks as shown in UniFi Network that comprise the section of my home-lab setup.
The next section will assume you have a running Raspberry Pi that is connected to your network and has been updated to a recent version of Rasbian. I am running this on a Raspberry Pi 3B+ with the Buster build of Raspbian.
Raspberry Pi Networking configuration
Add VLAN interfaces to the eth0 connection
Open a terminal session or connect to your Pi via SSH and then:
sudo nano /etc/rc.local
sudo ip link add link eth0 name eth48 type vlan id 48
sudo ip link add link eth0 name eth56 type vlan id 56
sudo ip link add link eth0 name eth64 type vlan id 64
sudo ip link add link eth0 name eth72 type vlan id 72
sudo ip link add link eth0 name eth80 type vlan id 80
sudo ip link add link eth0 name eth88 type vlan id 88
sudo ip link add link eth0 name eth96 type vlan id 96
sudo ip link add link eth0 name eth128 type vlan id 128
sudo ip link add link eth0 name eth136 type vlan id 136
sudo ip link add link eth0 name eth144 type vlan id 144
sudo ip link add link eth0 name eth152 type vlan id 152
sudo ip link add link eth0 name eth160 type vlan id 160
Save the file with a <Ctrl-O> and a <Ctrl-X> to exit the editor
Next is to edit and add the static IP address to each interface in the dhcpcd.conf file
sudo nano /etc/dhcpcd.conf
interface eth0
static ip_address=172.16.40.2/21
static routers=172.16.40.1
static domain_name_servers=8.8.8.8
static domain_search=
noipv6

interface eth48
static ip_address=172.16.48.2/21
static routers=
static domain_name_servers=
static domain_search=
noipv6

interface eth56
static ip_address=172.16.56.2/21
static routers=
static domain_name_servers=
static domain_search=
noipv6

interface eth64
static ip_address=172.16.64.2/21
static routers=
static domain_name_servers=
static domain_search=
noipv6

interface eth72
static ip_address=172.16.72.2/21
static routers=
static domain_name_servers=
static domain_search=
noipv6

interface eth80
static ip_address=172.16.80.2/21
static routers=
static domain_name_servers=
static domain_search=
noipv6

interface eth88
static ip_address=172.16.88.2/21
static routers=
static domain_name_servers=
static domain_search=
noipv6

interface eth96
static ip_address=172.16.96.2/21
static routers=
static domain_name_servers=
static domain_search=
noipv6

interface eth128
static ip_address=172.16.128.2/21
static routers=
static domain_name_servers=
static domain_search=
noipv6

interface eth136
static ip_address=172.16.136.2/21
static routers=
static domain_name_servers=
static domain_search=
noipv6

interface eth144
static ip_address=172.16.144.2/21
static routers=
static domain_name_servers=
static domain_search=
noipv6

interface eth152
static ip_address=172.16.152.2/21
static routers=
static domain_name_servers=
static domain_search=
noipv6

interface eth160
static ip_address=172.16.160.2/21
static routers=
static domain_name_servers=
static domain_search=
noipv6
Save the file with a <Ctrl-O> and a <Ctrl-X> to exit the editor
Reboot for the configuration to take effect and then the next section can be started.
Raspberry Pi webmin installation
webmin is an application that will allow you to administer a number of server functions on your Raspberry Pi via a web interface. I am specifically going to use this for managing DNS/BIND for my home-lab environment. This will let me configure and change host records and reverse DNS lookups for my ESXi, vCenter, NSX and other infrastructure. Also, this will become the primary DNS for guests running in my home-lab. I chose to use the Raspberry Pi for this mainly for ease of use and allow me to stand up the environment quickly if I want to power down all of my hosts and vCenter. By having the DNS external to my virtual environment, I can easily isolate and troubleshoot DNS issues. Because as we all know when there are connectivity issues it is:

Here is what I did in to install webmin and head down the rabbit hole of DNS configuration:
sudo apt-get update
sudo apt-get upgrade
sudo sh -c 'echo "deb http://ftp.au.debian.org/debian/ buster main non-free" > /etc/apt/sources.list.d/nonfree.list'
sudo apt update
sudo apt install wget

wget -qO - http://www.webmin.com/jcameron-key.asc | sudo apt-key add -
sudo sh -c 'echo "deb http://download.webmin.com/download/repository sarge contrib" > /etc/apt/sources.list.d/webmin.list'
sudo apt update
sudo apt install webmin
These instructions come directly from the webmin Wiki (https://doxfer.webmin.com/Webmin/Installation) for installing using apt (Debian/Ubuntu/Mint).
To access webmin I will then open a web browser with the following URL
https://172.16.40.2:10000/At this point the installation continues in webmin.
Raspberry Pi BIND9 installation
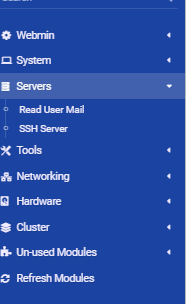
In the webmin interface select Un-uses Modules on the right-side menu and expand it.
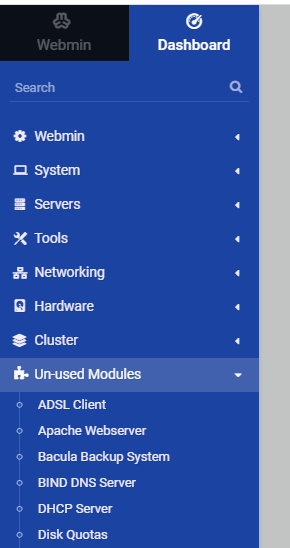
Select BIND DNS Server.

Select Install Now.
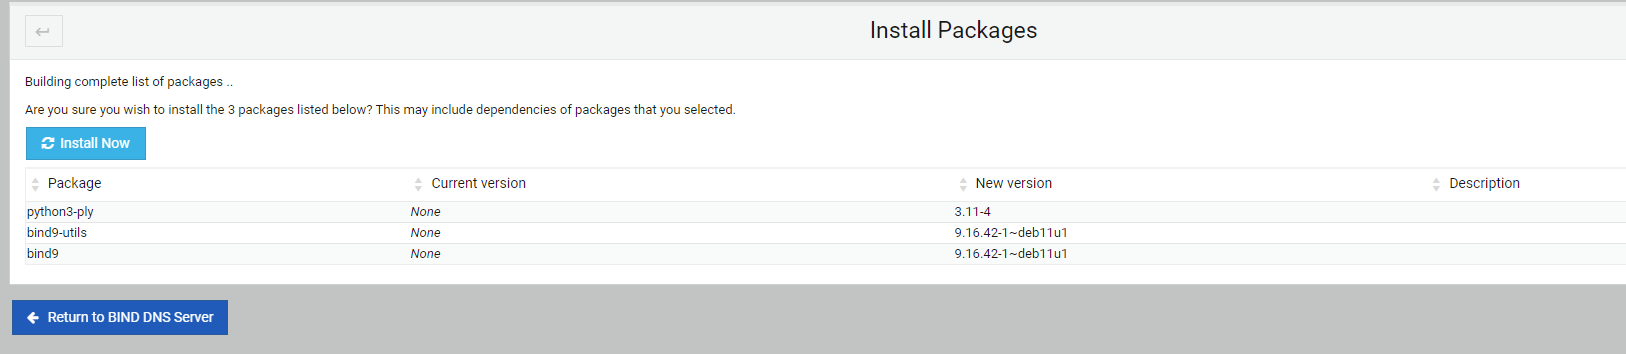
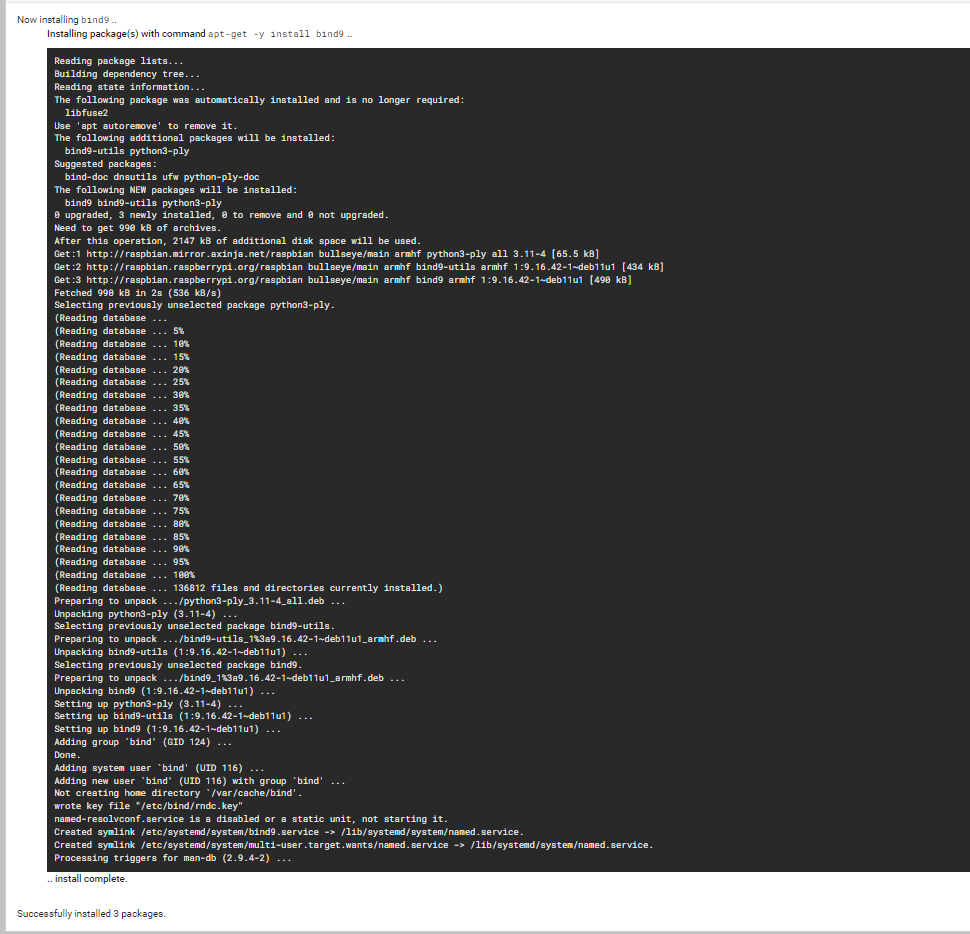
Allow the system to determine which packages need to be installed or updated. Then select Install Now above the package list. The system will load the various packages using apt and will finish and start BIND and load the module in webmin.
Now that BIND has been installed the DNS can start to be configured.
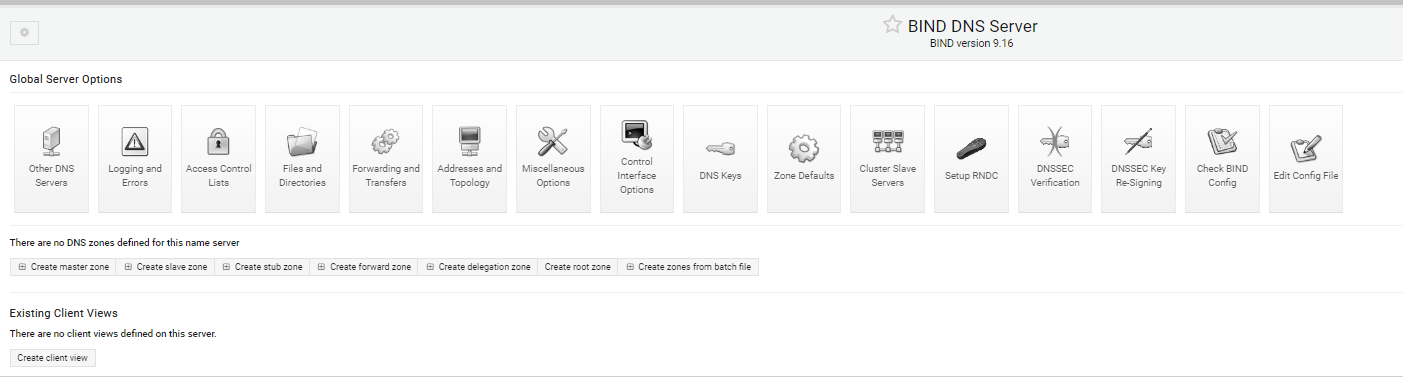
BIND9/webmin basic setup, DNS Forwarder configuration
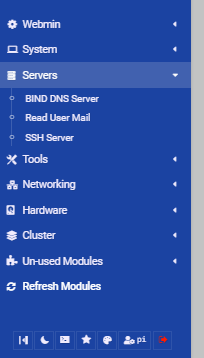
I had to select Refresh Modules at the bottom of the right-hand menu for BIND DNS Server to show up in the Servers list.
Once this has been done expand the Servers section and click on BIND DNS Server.
From here we have the basic setup of BIND. We will now setup the Forwarding and Transfers for this system so that it can reach other DNS servers on the network and if needed the internet.
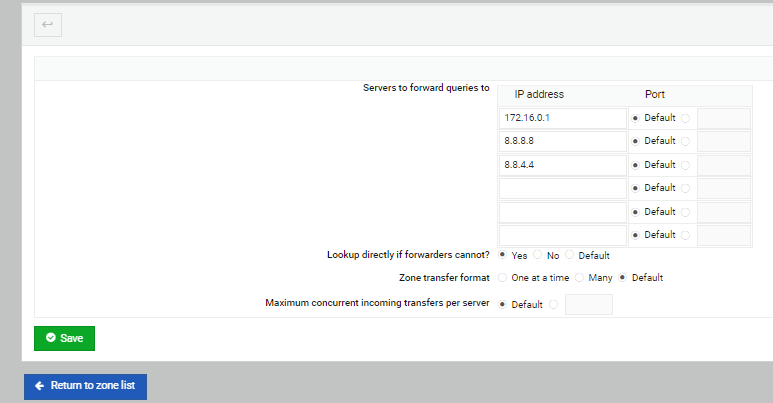
I set mine up to use my local UDM-SE as the first location for DNS lookups and to use two of the public Google DNS servers at 8.8.8.8 and 8.8.4.4.
If these servers cannot lookup the DNS entry, I’ve set BIND to try looking these up directly using the internet root DNS servers.
First, I’ll create a Root Zone with the various hints for the root DNS servers on the internet. Just select the Create root zone Button.
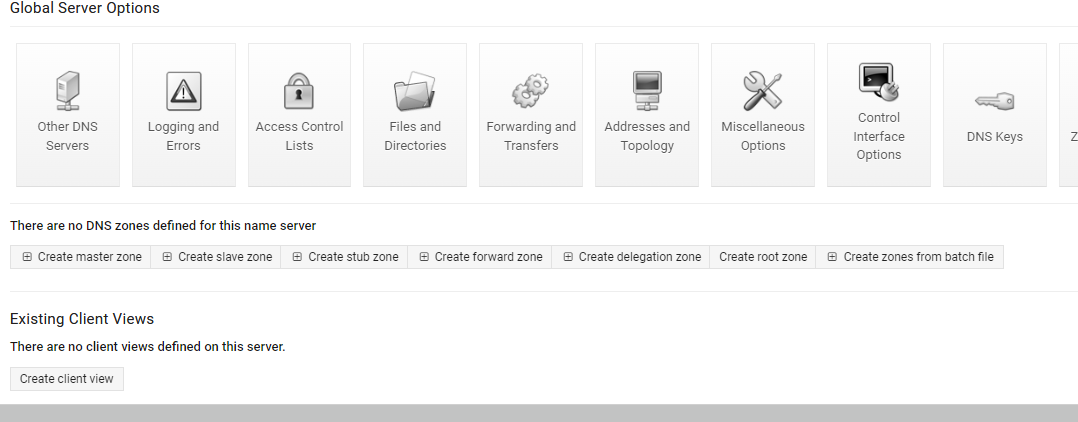
I’m choosing to use the default root servers included in the BIND 9 installation files.

This completes the basic DNS setup, and the next part will detail the setup of the zones for DNS and IP lookup.
BIND9/webmin reverse DNS configuration
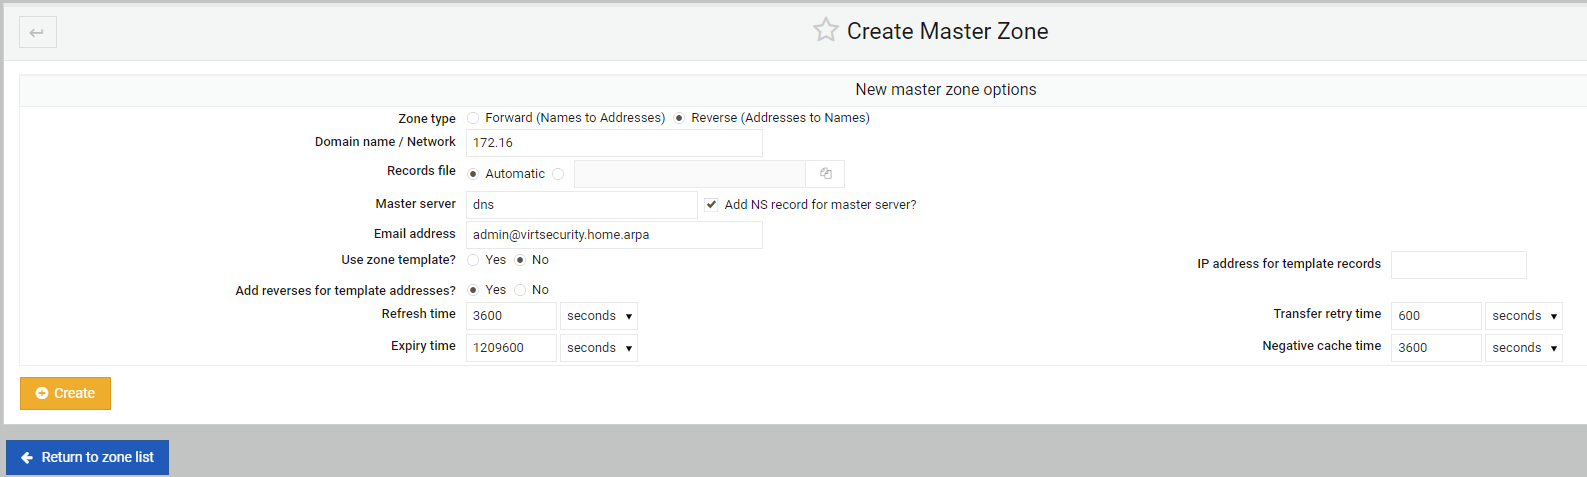
Before I start the configuration and setup of my virtsecurity DNS domain I want to setup reverse IP lookups. This will make it easier when setting up the A records for each host in my domain.

I choose the Zone type as “Reverse” and then fill out the first two octets of the Class B 172.16.x.x network in the Domain Name / Network field.
Then I fill in the Master server name of dns and the fake email address in this instance of admin@virtsecurity.home.arpa.
Then I select Create and the zone is created in BIND.
In the next screen presented I just return to the zone list and will continue in the next section with the creation of the virtsecurity.home.arpa dns domain.
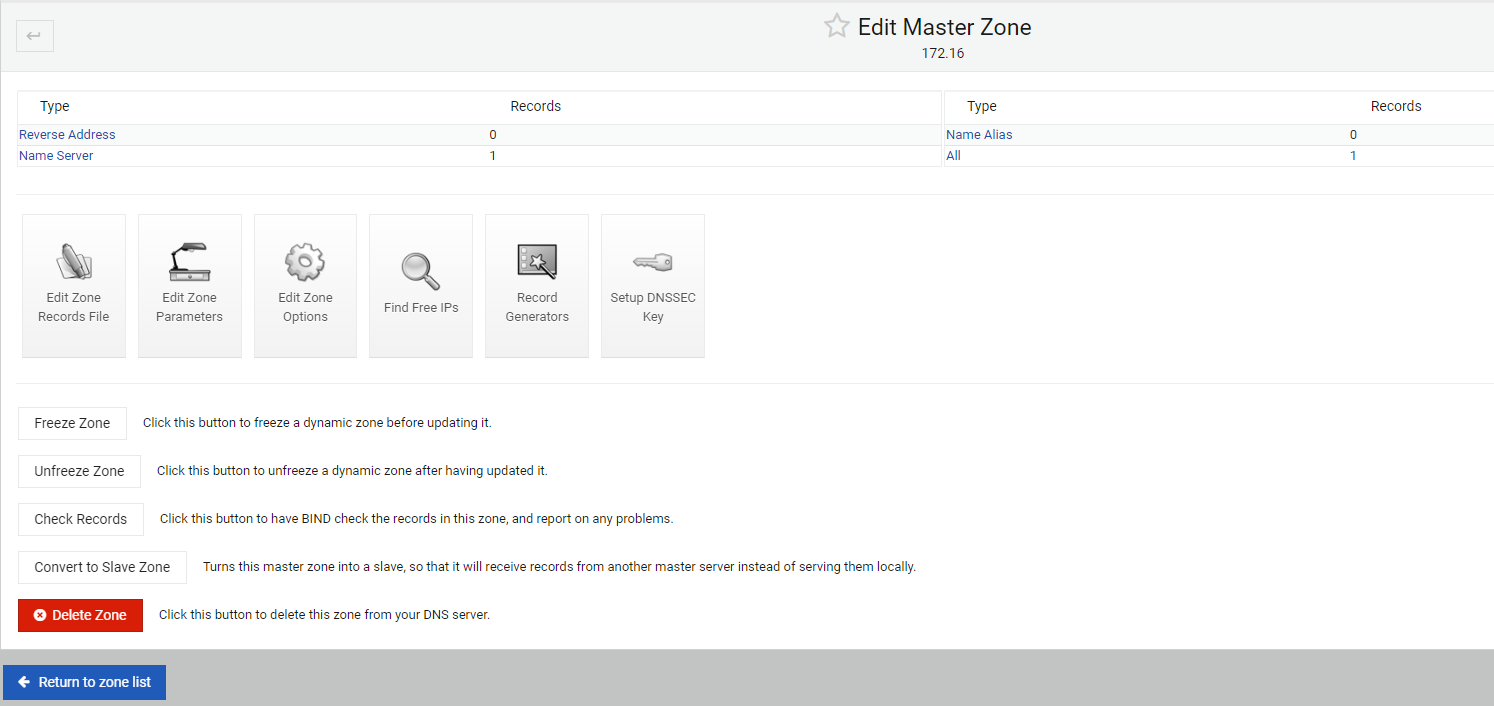
BIND9/webmin virtsecurity.local configuration
Next I setup my local domain of virtsecurity.home.arpa. I’m using virtsecurity.home.arpa instead of virtsecurity.local as it complies with RFC 8375 https://www.rfc-editor.org/rfc/rfc8375.html
To do this I’ll select the Create master zone Button just as it was during the reverse DNS zone creation.

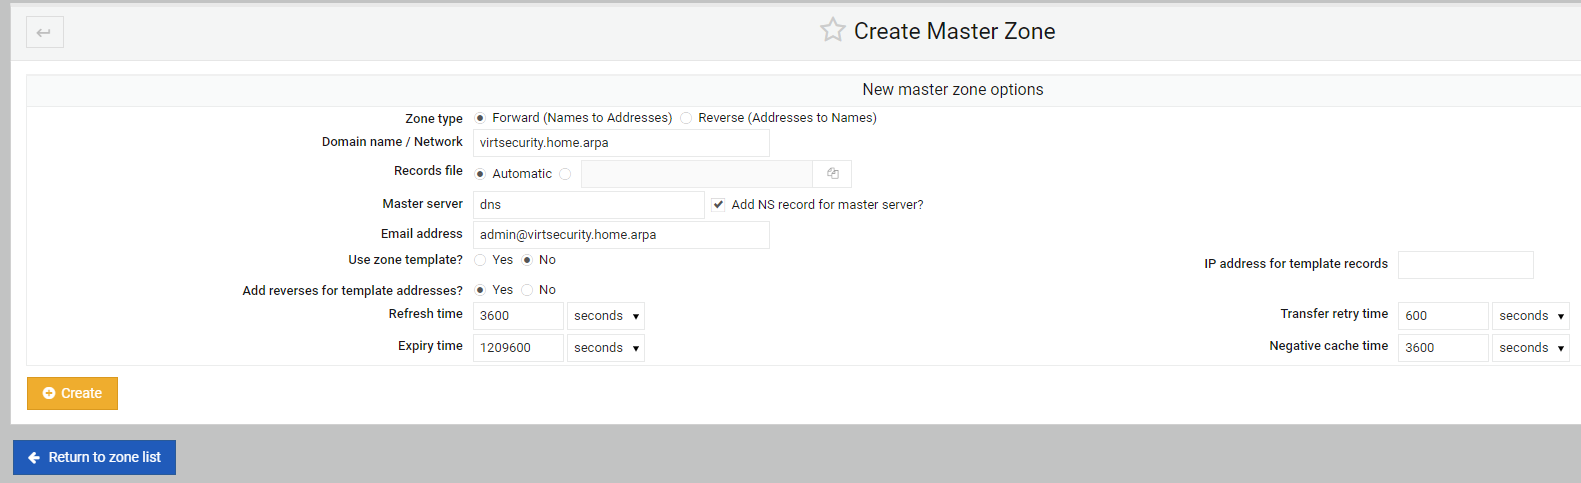
I choose the Zone type as “Forward” and then fill out the name of virtsecurity.home.arpa in the Domain Name / Network field.
Again I fill in the Master server name of dns and the fake email address in this instance of admin@virtsecurity.home.arpa.
Then I select Create and the zone is created in BIND.
This is the screen you return to after selecting Create.
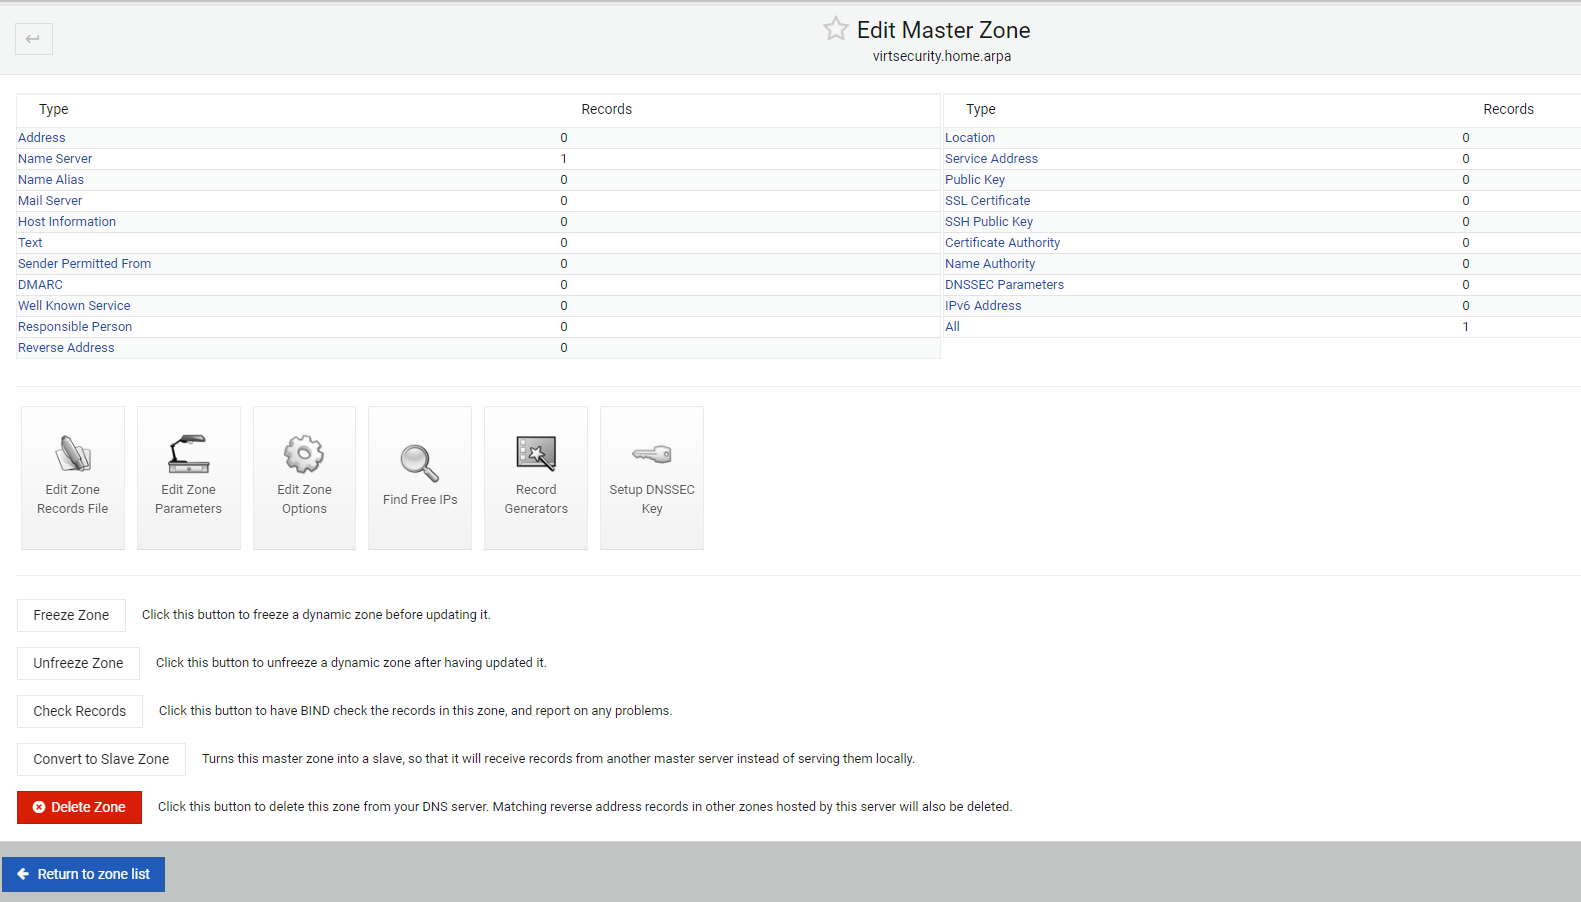
Instead of returning to the zone list. I select the “Addresses” hyperlink where I can then start adding DNS A records for the hosts in my home-lab. Here below I start with creating a record for my Raspberry Pi DNS server with its name of dns. You can leave off the domain name as all systems in this group will have the same domain name appended of virtsecurity.home.arpa. I also input the IP address and select the radio button for Update Reverse (and replace existing). While in a newly created zone and with a newly created host I have often found it beneficial to force a replacement of the reverse lookup concurrently with the creation of these records.
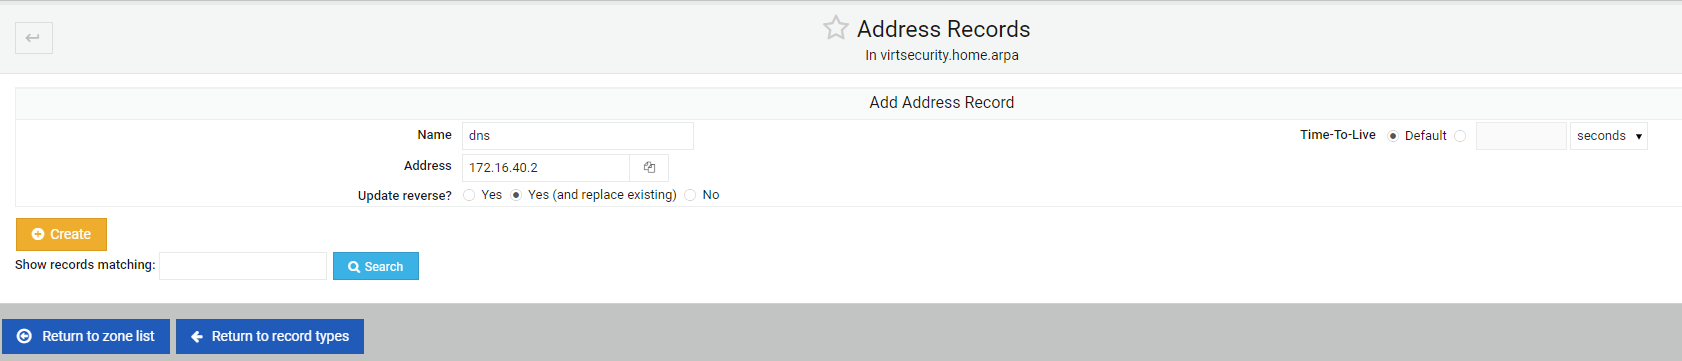
I will now cycle through the input of the four ESXi hosts and my vCenter. Below is the IP addressing used for each:
vCenter 172.16.40.100
ESX1    172.16.40.101
ESX2    172.16.40.102
ESX3    172.16.40.103
ESX4    172.16.40.104
This is what the screen looks like while adding the last host.
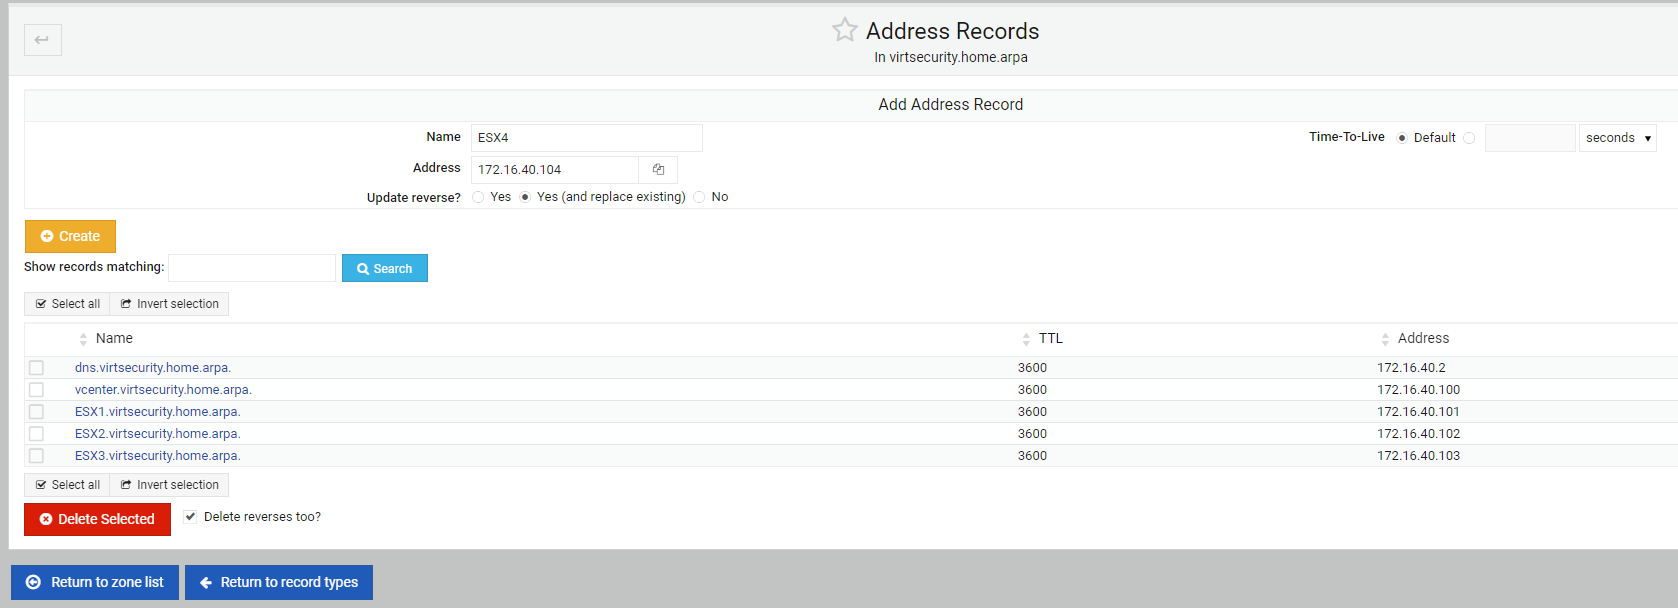
At this point I can return to the zone list and setup is complete.
DNS Testing
Did it work? This is always the important question. To test I will open a command prompt on my laptop and use the nslookup tool in Windows. Another possible testing tool would be dig if you are using a Linux kernel-based system. Once I’ve opened a command prompt and run nslookup I change my default DNS server using the server {ip address} command. In my case this will be server 172.16.40.2
Then I will try and execute a lookup for vcenter, vcenter.virtsecurity.home.arpa and then 172.16.40.2
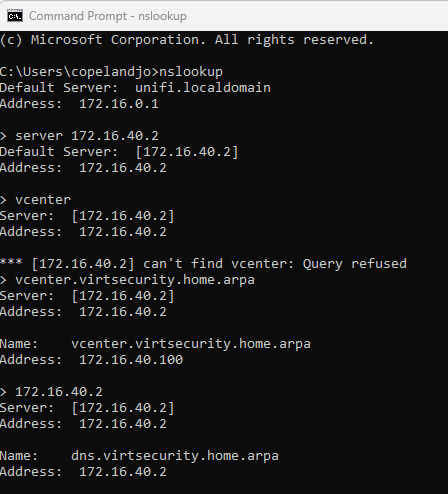
Notice that on the first attempt with just vcenter I had a “can’t find vcenter: Query refused” response. This is due to the fact that this is a short name, and the DNS system is only answering queries for Fully Qualified Domain Names. On the next attempts for vcenter.virtsecurity.home.arpa it provided the correct IP that was expected. In testing a reverse lookup of 172.16.40.2 it responded with the correct name of dns.virtsecurity.home.arpa.
I’ll call that success.
UniFi Port Aggregation LAG/LACP and vSphere considerations
I’ll have to wait on setting up the LAG/LACP on the 10GbE Switches until vCenter is up and running. I’m going to need to do some research on what type of Hashing should be set on the vCenter Distributed switch uplinks with the Ubiquiti Unifi networking stack. But that will be down the line a bit.
Next time vCenter / vSphere installation and basic networking
In the next installment I’ll be installing vSphere 8.x on each of the hosts and setting up vCenter with basic networking for vMotion, VSAN and one or two Guest networks.
Until next time y’all!
