Home Lab 2 – Ubiquiti UniFi networking and DNS considerations

IP Address Class consideration

Class is in session.

Every so often I see organizations using Class C private IP address ranges . When I see this it makes me think that I’ve run across a company where the business was so successful they had no time to work through developing an IP schema.

I’ve had some growth pains in using a Class C range and with a new home-lab this caused me to spend some time to decide which Private IP range and class I needed. Since I’ve run into issues dealing with conflicting ranges using the Class A 10.x.x.x and my corporate VPN tunnel that range was out of the running early on. Class C was too many small subnets and plainly grouping them into a supernet was overkill.

So, I chose to use a Private Class B network in my home network to allow me more flexibility in carving out various subnets. This will allow me to use a /21 CIDR block to carve up the 172.16.x.x network into multiple ranges. Some of these are overkill and some are possible future expansion that I wanted to have in for planning now.

IP Ranges
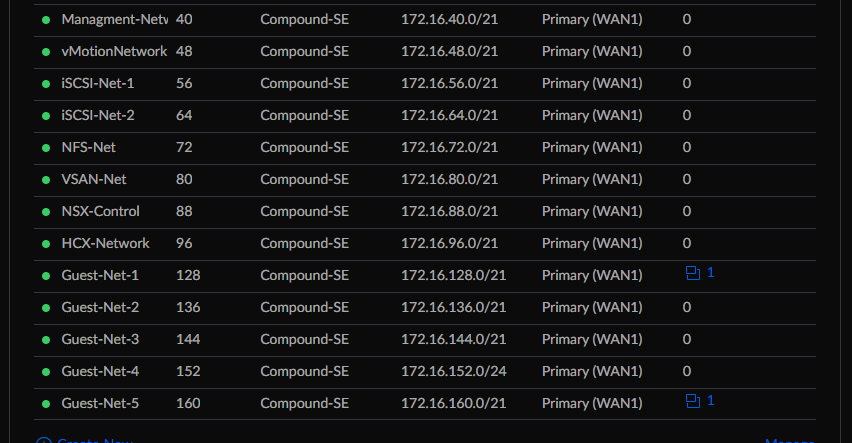
172.16.40.0/21 – Management Network – VLAN 40
172.16.48.0/21 – vMotion Network – VLAN 48
172.16.56.0/21 – ISCSI – Network 1 – VLAN 56
172.16.64.0/21 – ISCSI – Network 2 – VLAN 64
172.16.72.0/21 – NFS Network – VLAN 72
172.16.80.0/21 – VSAN Network – VLAN 80
172.16.88.0/21 – NSX Control – VLAN 88
172.16.96.0/21 – HCX – VLAN 96
172.16.128.0/21 – Guest Network 1 – VLAN 128
172.16.136.0/21 – Guest Network 2 – VLAN 136
172.16.144.0/21 – Guest Network 3 – VLAN 144
172.16.152.0/21 – Guest Network 4 – VLAN 152
172.16.160.0/21 – Guest Network 5 – VLAN 160

Ubiquiti UniFi network VLAN setup with DHCP and DNS Options

In order to work with the above stated IP address ranges, I tore down my existing UniFi Networking setup and replaced it with a basic Default network (VLAN 0) configuration of 172.16.0.0/21 and this is where all of my networking equipment management IP addresses live.

In the UniFi interface under setup and networking I created multiple networks for various uses in my home network such as a separate IoT network and a Guest network for Wi-Fi and associated SSID broadcast. Along with two different networks for my house and one for my in-laws who live here on property with us.

Here is an example of the setup for Guest Network 5 using the 172.16.160.0/21 Network and VLAN 160
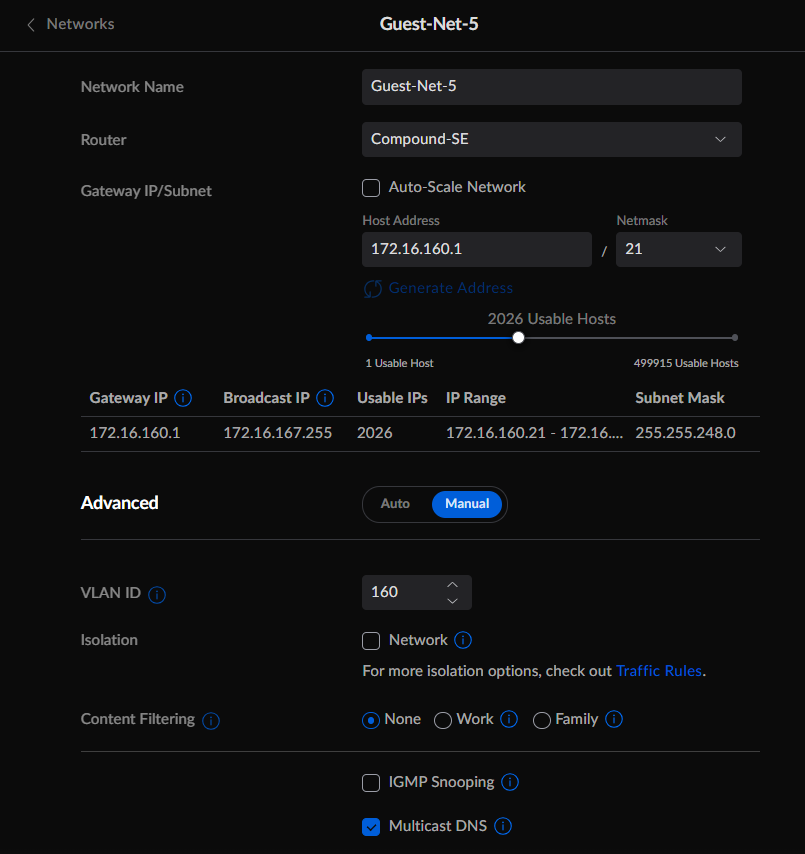
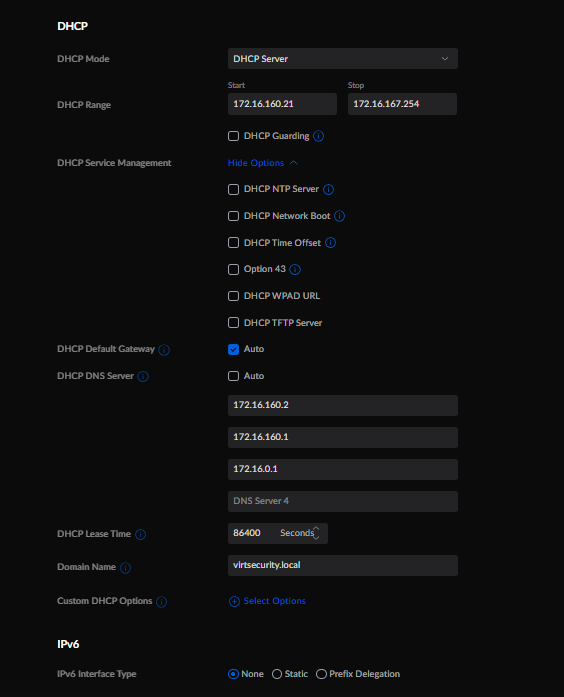
I setup the DHCP ranges with a very large block of IP addresses. I may alter this later as I start to build out workloads in these various CIDR ranges. In each network I added the Raspberry PI IP address on that network as a DNS server, the Ubiquiti Dream Machine SE (UDM-SE) IP Gateway address and the overall UDM-SE IP address as fallback DNS servers. Currently each IP address range is routable internally and can reach the internet. Eventually I will add Firewall rules that will restrict internet and intra-VLAN access. Currently this is not needed.

Here is a screen shot of the Networks as shown in UniFi Network that comprise the section of my home-lab setup.
The next section will assume you have a running Raspberry Pi that is connected to your network and has been updated to a recent version of Rasbian. I am running this on a Raspberry Pi 3B+ with the Buster build of Raspbian.

Raspberry Pi Networking configuration

Add VLAN interfaces to the eth0 connection
Open a terminal session or connect to your Pi via SSH and then:

sudo nano /etc/rc.local
sudo ip link add link eth0 name eth48 type vlan id 48
sudo ip link add link eth0 name eth56 type vlan id 56
sudo ip link add link eth0 name eth64 type vlan id 64
sudo ip link add link eth0 name eth72 type vlan id 72
sudo ip link add link eth0 name eth80 type vlan id 80
sudo ip link add link eth0 name eth88 type vlan id 88
sudo ip link add link eth0 name eth96 type vlan id 96
sudo ip link add link eth0 name eth128 type vlan id 128
sudo ip link add link eth0 name eth136 type vlan id 136
sudo ip link add link eth0 name eth144 type vlan id 144
sudo ip link add link eth0 name eth152 type vlan id 152
sudo ip link add link eth0 name eth160 type vlan id 160

Save the file with a <Ctrl-O> and a <Ctrl-X> to exit the editor
Next is to edit and add the static IP address to each interface in the dhcpcd.conf file

sudo nano /etc/dhcpcd.conf
interface eth0
static ip_address=172.16.40.2/21
static routers=172.16.40.1
static domain_name_servers=8.8.8.8
static domain_search=
noipv6

interface eth48
static ip_address=172.16.48.2/21
static routers=
static domain_name_servers=
static domain_search=
noipv6

interface eth56
static ip_address=172.16.56.2/21
static routers=
static domain_name_servers=
static domain_search=
noipv6

interface eth64
static ip_address=172.16.64.2/21
static routers=
static domain_name_servers=
static domain_search=
noipv6

interface eth72
static ip_address=172.16.72.2/21
static routers=
static domain_name_servers=
static domain_search=
noipv6

interface eth80
static ip_address=172.16.80.2/21
static routers=
static domain_name_servers=
static domain_search=
noipv6

interface eth88
static ip_address=172.16.88.2/21
static routers=
static domain_name_servers=
static domain_search=
noipv6

interface eth96
static ip_address=172.16.96.2/21
static routers=
static domain_name_servers=
static domain_search=
noipv6

interface eth128
static ip_address=172.16.128.2/21
static routers=
static domain_name_servers=
static domain_search=
noipv6

interface eth136
static ip_address=172.16.136.2/21
static routers=
static domain_name_servers=
static domain_search=
noipv6

interface eth144
static ip_address=172.16.144.2/21
static routers=
static domain_name_servers=
static domain_search=
noipv6

interface eth152
static ip_address=172.16.152.2/21
static routers=
static domain_name_servers=
static domain_search=
noipv6

interface eth160
static ip_address=172.16.160.2/21
static routers=
static domain_name_servers=
static domain_search=
noipv6 

Save the file with a <Ctrl-O> and a <Ctrl-X> to exit the editor
Reboot for the configuration to take effect and then the next section can be started.

Raspberry Pi webmin installation

webmin is an application that will allow you to administer a number of server functions on your Raspberry Pi via a web interface. I am specifically going to use this for managing DNS/BIND for my home-lab environment. This will let me configure and change host records and reverse DNS lookups for my ESXi, vCenter, NSX and other infrastructure. Also, this will become the primary DNS for guests running in my home-lab. I chose to use the Raspberry Pi for this mainly for ease of use and allow me to stand up the environment quickly if I want to power down all of my hosts and vCenter. By having the DNS external to my virtual environment, I can easily isolate and troubleshoot DNS issues. Because as we all know when there are connectivity issues it is:
Here is what I did in to install webmin and head down the rabbit hole of DNS configuration:

sudo apt-get update 
sudo apt-get upgrade
sudo sh -c 'echo "deb http://ftp.au.debian.org/debian/ buster main non-free" > /etc/apt/sources.list.d/nonfree.list'
sudo apt update
sudo apt install wget

wget -qO - http://www.webmin.com/jcameron-key.asc | sudo apt-key add -
sudo sh -c 'echo "deb http://download.webmin.com/download/repository sarge contrib" > /etc/apt/sources.list.d/webmin.list'
sudo apt update
sudo apt install webmin

These instructions come directly from the webmin Wiki (https://doxfer.webmin.com/Webmin/Installation) for installing using apt (Debian/Ubuntu/Mint).

To access webmin I will then open a web browser with the following URL

https://172.16.40.2:10000/

At this point the installation continues in webmin.

Raspberry Pi BIND9 installation

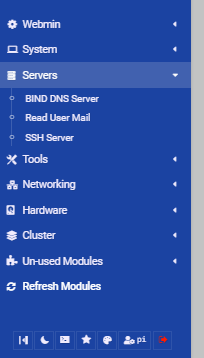
In the webmin interface select Un-uses Modules on the right-side menu and expand it.
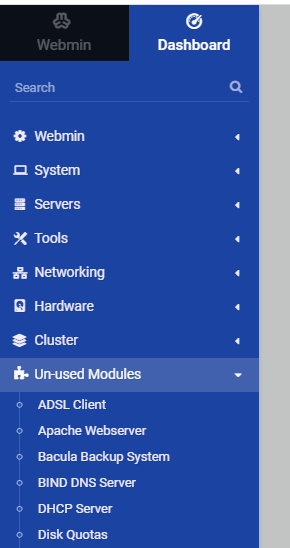
Select BIND DNS Server.

Select Install Now.

Allow the system to determine which packages need to be installed or updated. Then select Install Now above the package list. The system will load the various packages using apt and will finish and start BIND and load the module in webmin.
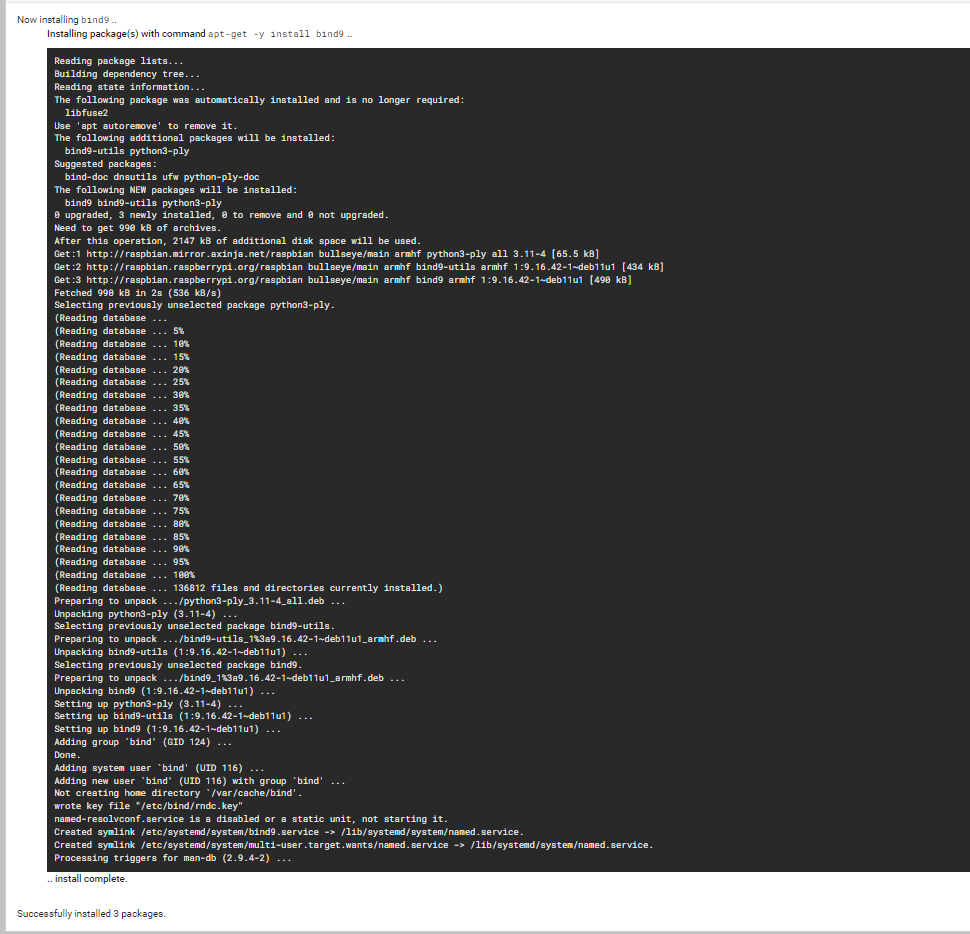
Now that BIND has been installed the DNS can start to be configured.

BIND9/webmin basic setup, DNS Forwarder configuration

I had to select Refresh Modules at the bottom of the right-hand menu for BIND DNS Server to show up in the Servers list.
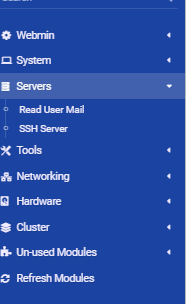
Once this has been done expand the Servers section and click on BIND DNS Server.
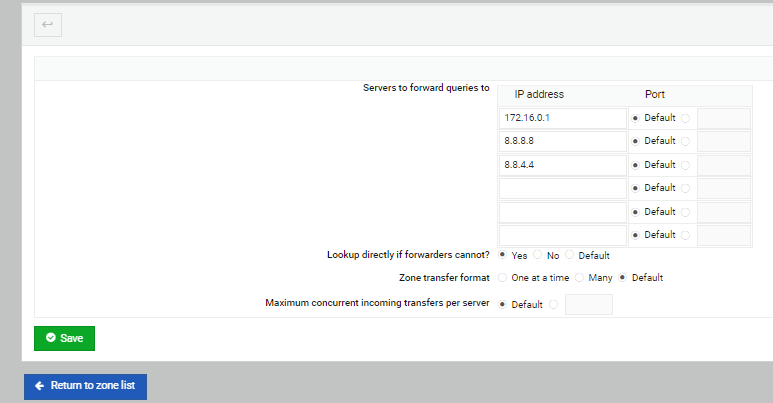
From here we have the basic setup of BIND. We will now setup the Forwarding and Transfers for this system so that it can reach other DNS servers on the network and if needed the internet.

I set mine up to use my local UDM-SE as the first location for DNS lookups and to use two of the public Google DNS servers at 8.8.8.8 and 8.8.4.4.
If these servers cannot lookup the DNS entry, I’ve set BIND to try looking these up directly using the internet root DNS servers.
First, I’ll create a Root Zone with the various hints for the root DNS servers on the internet. Just select the Create root zone Button.
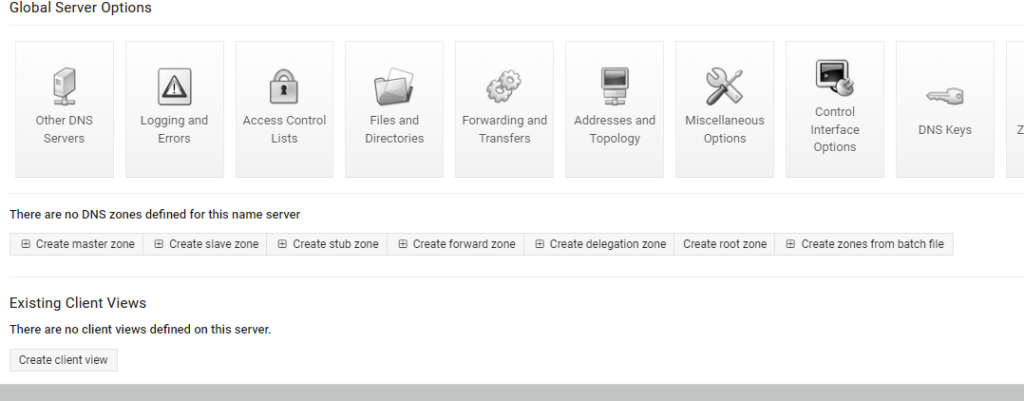
I’m choosing to use the default root servers included in the BIND 9 installation files.

This completes the basic DNS setup, and the next part will detail the setup of the zones for DNS and IP lookup.

BIND9/webmin reverse DNS configuration

Before I start the configuration and setup of my virtsecurity DNS domain I want to setup reverse IP lookups. This will make it easier when setting up the A records for each host in my domain.

I choose the Zone type as “Reverse” and then fill out the first two octets of the Class B 172.16.x.x network in the Domain Name / Network field.
Then I fill in the Master server name of dns and the fake email address in this instance of admin@virtsecurity.home.arpa.
Then I select Create and the zone is created in BIND.

In the next screen presented I just return to the zone list and will continue in the next section with the creation of the virtsecurity.home.arpa dns domain.
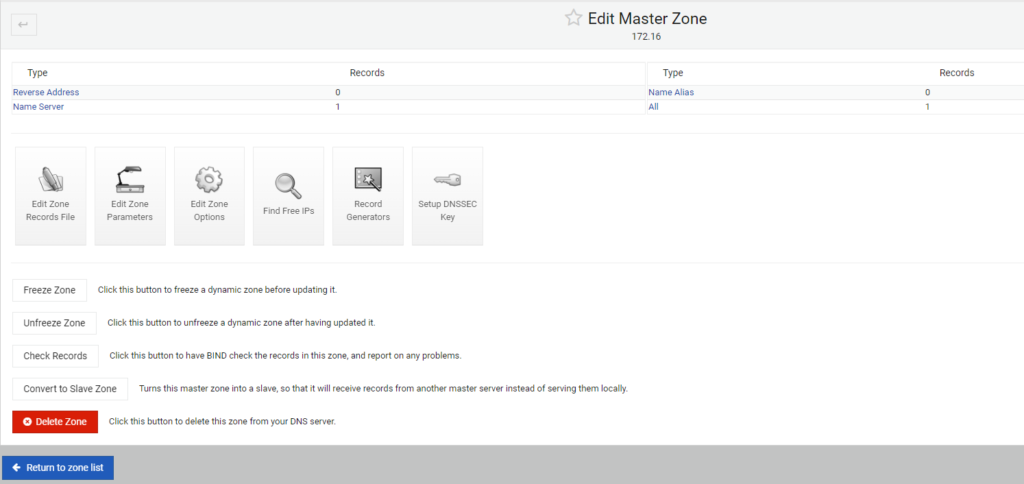
BIND9/webmin virtsecurity.local configuration

Next I setup my local domain of virtsecurity.home.arpa. I’m using virtsecurity.home.arpa instead of virtsecurity.local as it complies with RFC 8375 https://www.rfc-editor.org/rfc/rfc8375.html
To do this I’ll select the Create master zone Button just as it was during the reverse DNS zone creation.

I choose the Zone type as “Forward” and then fill out the name of virtsecurity.home.arpa in the Domain Name / Network field.
Again I fill in the Master server name of dns and the fake email address in this instance of admin@virtsecurity.home.arpa.
Then I select Create and the zone is created in BIND.

This is the screen you return to after selecting Create.
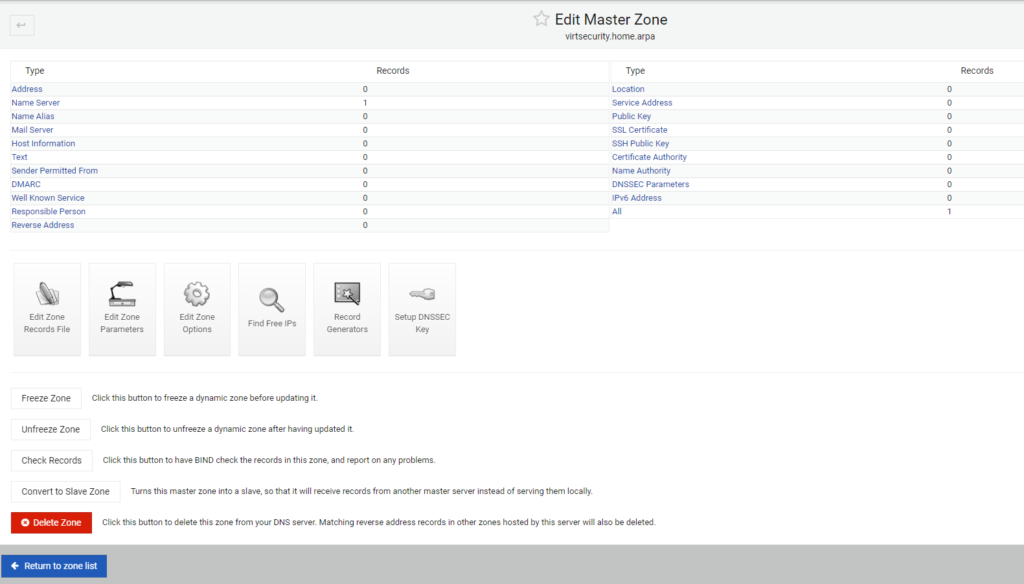
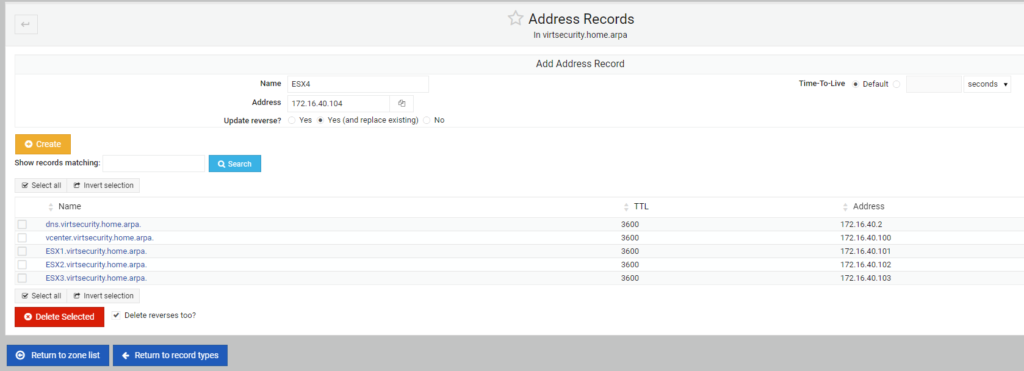
Instead of returning to the zone list. I select the “Addresses” hyperlink where I can then start adding DNS A records for the hosts in my home-lab. Here below I start with creating a record for my Raspberry Pi DNS server with its name of dns. You can leave off the domain name as all systems in this group will have the same domain name appended of virtsecurity.home.arpa. I also input the IP address and select the radio button for Update Reverse (and replace existing). While in a newly created zone and with a newly created host I have often found it beneficial to force a replacement of the reverse lookup concurrently with the creation of these records.

I will now cycle through the input of the four ESXi hosts and my vCenter. Below is the IP addressing used for each:

vCenter 172.16.40.100
ESX1    172.16.40.101
ESX2    172.16.40.102
ESX3    172.16.40.103
ESX4    172.16.40.104

This is what the screen looks like while adding the last host.
At this point I can return to the zone list and setup is complete.

DNS Testing

Did it work? This is always the important question. To test I will open a command prompt on my laptop and use the nslookup tool in Windows. Another possible testing tool would be dig if you are using a Linux kernel-based system. Once I’ve opened a command prompt and run nslookup I change my default DNS server using the server {ip address} command. In my case this will be server 172.16.40.2
Then I will try and execute a lookup for vcenter, vcenter.virtsecurity.home.arpa and then 172.16.40.2
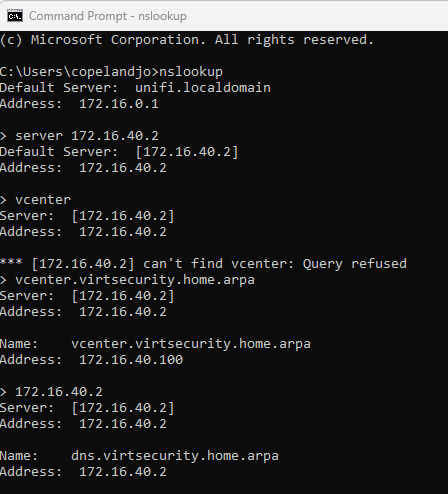
Notice that on the first attempt with just vcenter I had a “can’t find vcenter: Query refused” response. This is due to the fact that this is a short name, and the DNS system is only answering queries for Fully Qualified Domain Names. On the next attempts for vcenter.virtsecurity.home.arpa it provided the correct IP that was expected. In testing a reverse lookup of 172.16.40.2 it responded with the correct name of dns.virtsecurity.home.arpa.

I’ll call that success.

UniFi Port Aggregation LAG/LACP and vSphere considerations

I’ll have to wait on setting up the LAG/LACP on the 10GbE Switches until vCenter is up and running. I’m going to need to do some research on what type of Hashing should be set on the vCenter Distributed switch uplinks with the Ubiquiti Unifi networking stack. But that will be down the line a bit.

Next time vCenter / vSphere installation and basic networking

In the next installment I’ll be installing vSphere 8.x on each of the hosts and setting up vCenter with basic networking for vMotion, VSAN and one or two Guest networks.

Until next time y’all!

VMware Explore US 2023

For the first time since VMWorld 2019 I am planning on being back in person at VMware Explore US 2023 in Las Vegas. This is going to be my first time in person as a VMware employee. I am really looking forward to connecting with customer and fellow champions in the vExpert and VMUG communities.

I am going to be working in the VMware Cloud booth supporting and talking about OCVS (Oracle Cloud VMware Solution). Come by and find me in my cowboy hat and boots and let’s chat about how you could benefit from using OCVS and how it will tie into your multi-cloud strategy. I will also likely have some stickers for your laptop.

Some of my favorite things about events like this are seeing customers and partners that I have known over the years. Having the ability to learn new techniques and technologies during the general sessions is always exciting. The breakout sessions also add deeper understanding and access to Product Management and senior engineers and consultants. I’m currently scheduled to be co-presenting about OCVS with a peer from Oracle during a breakout session on Wednesday.

One of my favorite things to do is to wander around the expo floor and see new and upcoming software vendors and new hardware. There are many good nuggets of treasure that can be found while wandering. Remember that those who wander are not lost. And making connections and having random hallway conversations that often provide answers for problems or help brainstorm new methods. Putting so much brain power into one place is so powerful on influencing trends in architecture and design. I just love conferences like this. How about you? What are the things that make you excited about VMware Explore? Will you be attending? Let’s catch up in person and see all y’all soon!

Blogging but slowly

I had really wanted to kick my blogging into gear this year. I’ve made some efforts into posting about my new home lab and have plans to do more of those. I may even try my hand at some videos, I have been encouraged to try this by my manager as he has seen that the statistics on video blogs are much higher than just a traditional blog.

During the second half of May my dad went into the hospital and they found that he has colon cancer. This threw a wrench in plans for home lab blogging and blogs about things for work. We are working through getting his anemia under control and have gotten a treatment plan in place for him. They have determined it is a Stage 2 non-metastasizing cancer that should be treated by chemotherapy drugs and radiation therapy. During this time we have been able to get a bathroom and closet in his house remodeled and updated for handicap access which should make things much easier during his treatment and recovery.

In case you don’t know it but my wife and I are full time caregivers for her parents. They live on property with us and are in their mid to late eighties. Her dad has had multiple strokes and can no longer drive and her mom has her own health problems.

During the pandemic we lost my mom to Alzheimer’s disease. My dad was the primary caregiver for her during the last 8 years of her life and we helped him with her. He is still the primary caregiver for my disabled sister.

If you have someone in your family that is a caregiver please make sure to give them your love and support. Also give them a listening ear and real empathy and not fake sympathy. It is an often overlooked role in many cultures.

I am still planning on getting more blogs out but they may come out over time when there is time and brain power to write. Until then have a great week!

Home Lab 1 – The Unboxing

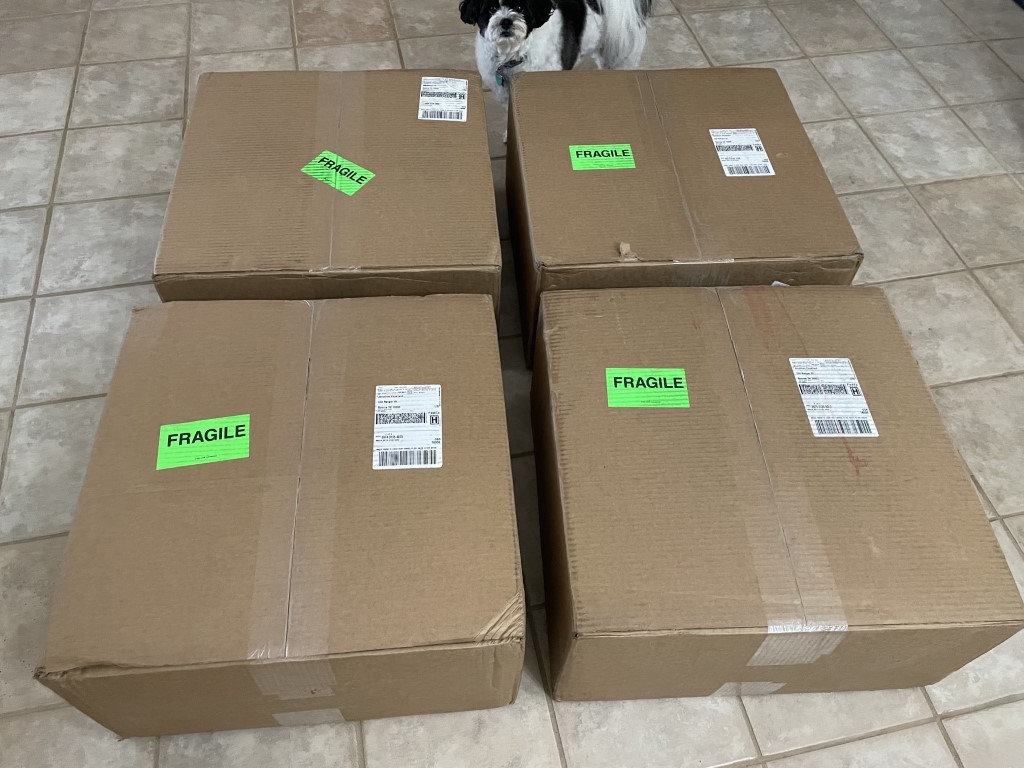
The day finally came when the shipment from PC Server and Parts arrived. It was four nicely packed boxes weighing in at a small 47 pounds apiece.

Of course they had to pass customs inspection of the DSA (Dog Security Agency). After inspection and finding that these packages included no biscuits or other materials that would be confiscated then the full unboxing could commence.

Here is the hardware list again:

  • Quantity four (4) Dell Precision Tower 7820 Workstation
    • Processors: 2x (2.20 GHz) 10-Core Intel Xeon Silver 4114 Processors
    • Memory (RAM): 384GB (12x32GB) DDR4 2133 MHz PC4 R Memory
    • Storage:
      • 1TB SSD SATA 6GB/s 2.5″ Solid State Drive
      • M.2 Storage: 2TB M.2 NVMe Solid State Drive
      • HP Z Turbo M.2 Adapter Card
    • Graphics Card: Nvidia Quadro K600 1GB DDR3
    • Network: Intel X540 Dual 10GbE network card
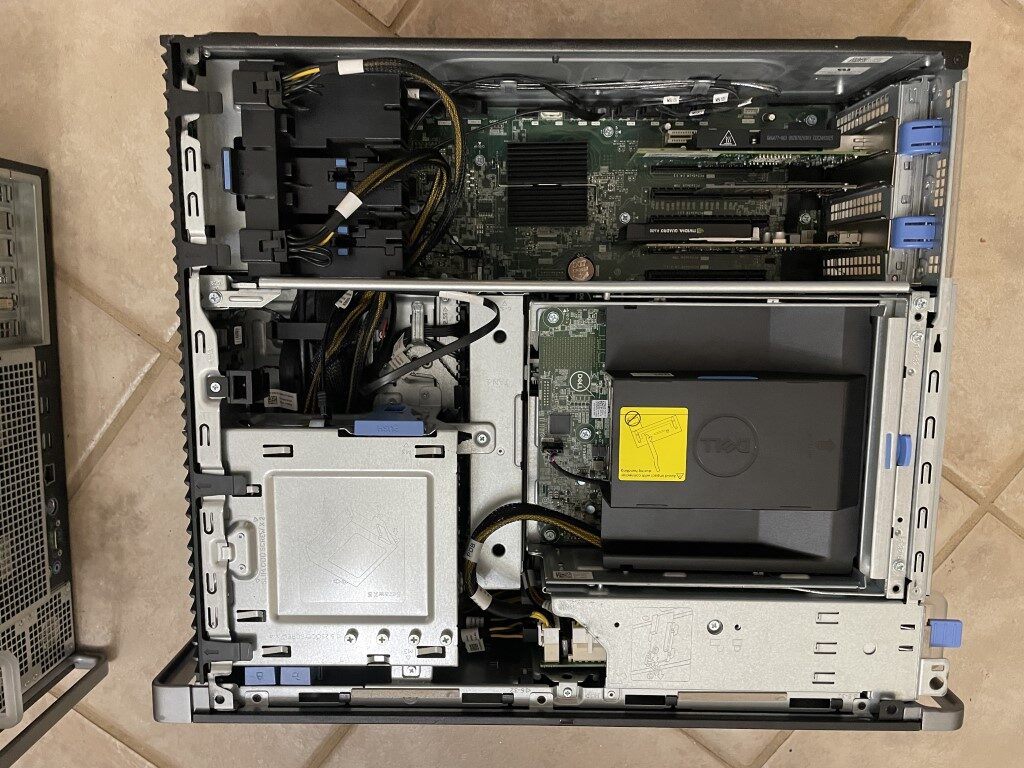
Side view of one of the 4 systems. The card closest to the top of the picture is the dual port 10GbE network card. The middle PCI is a single PCIe NVMe adapter that holds the 2TB NVMe device and then the NVidia Quadro video card.
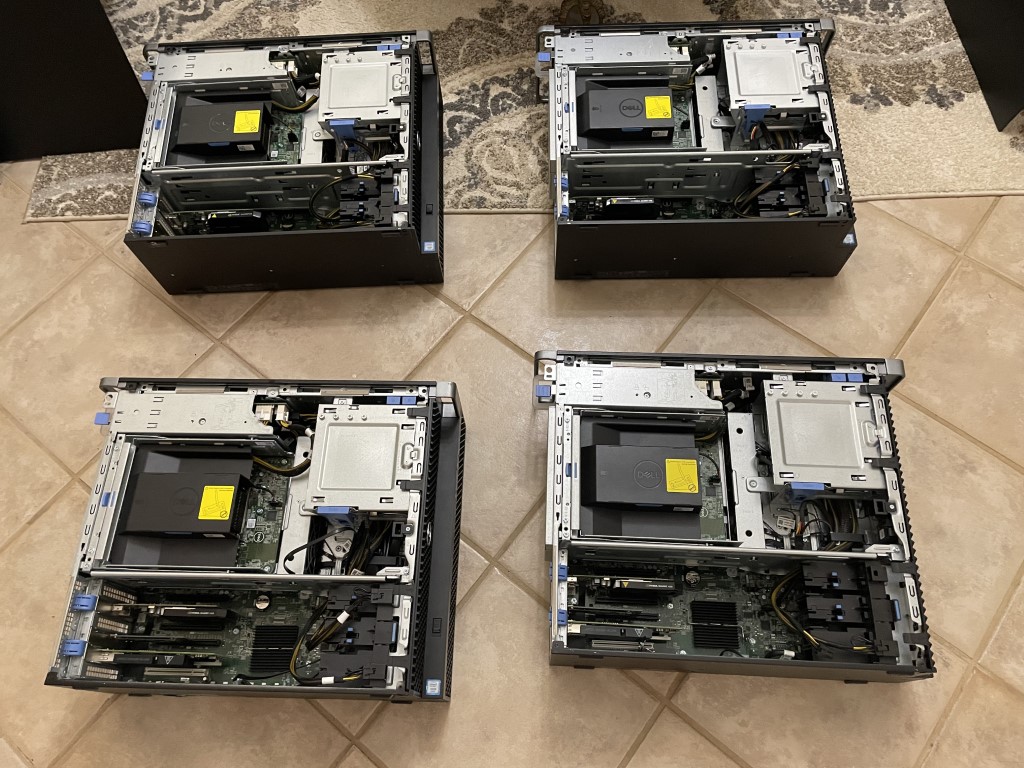
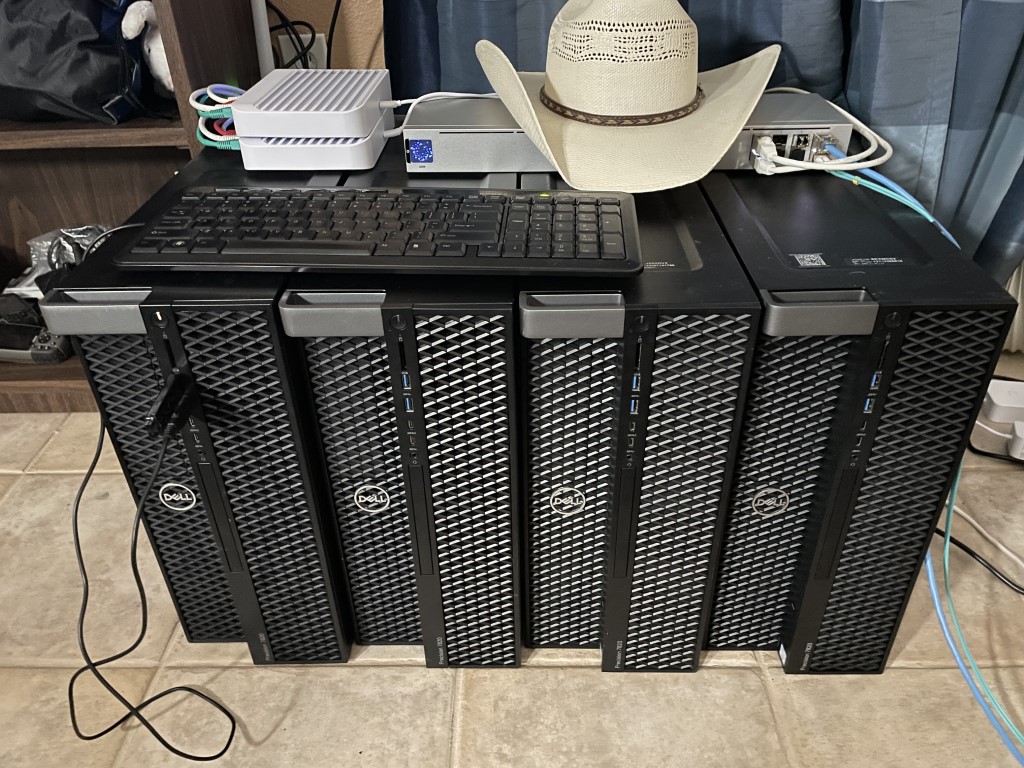
All four systems looking identical with their side access panels off.
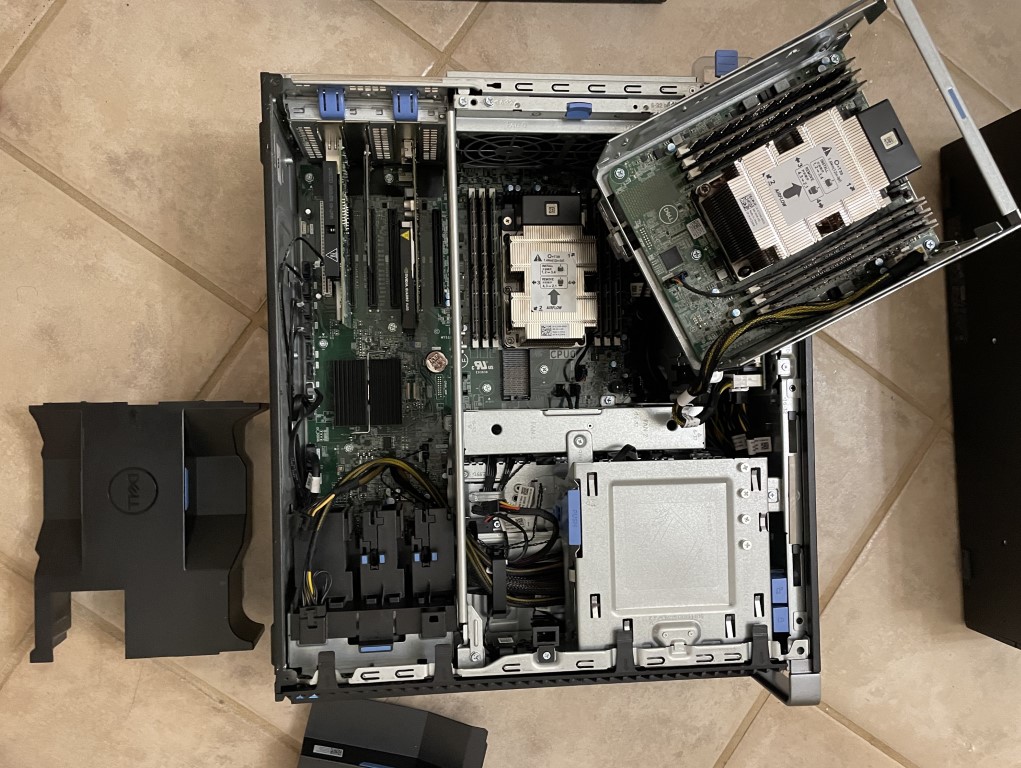
The CPU fan shroud removed along with the 2nd Processor and memory tray. This is how the system allows for dual processors and 12 slots for memory. Both the upper tray and the base motherboard have good airflow shrouds and large CPU coolers.
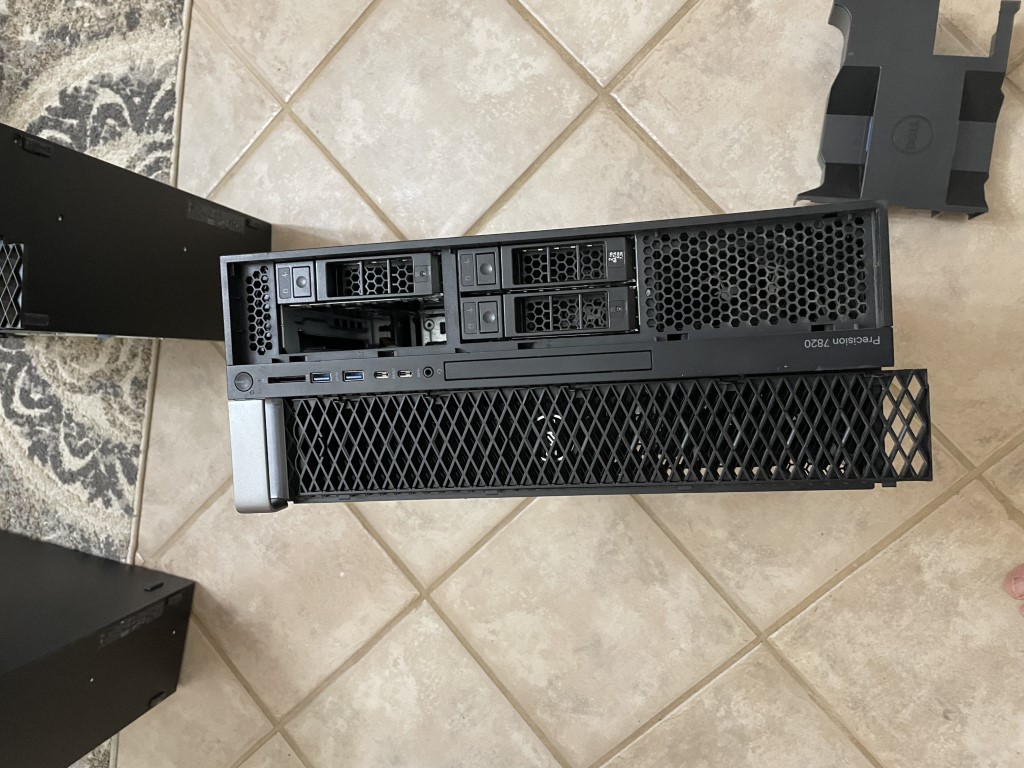
Front bezel removed showing the 4 removable drive bays. All 4 of these were missing a drive sled.
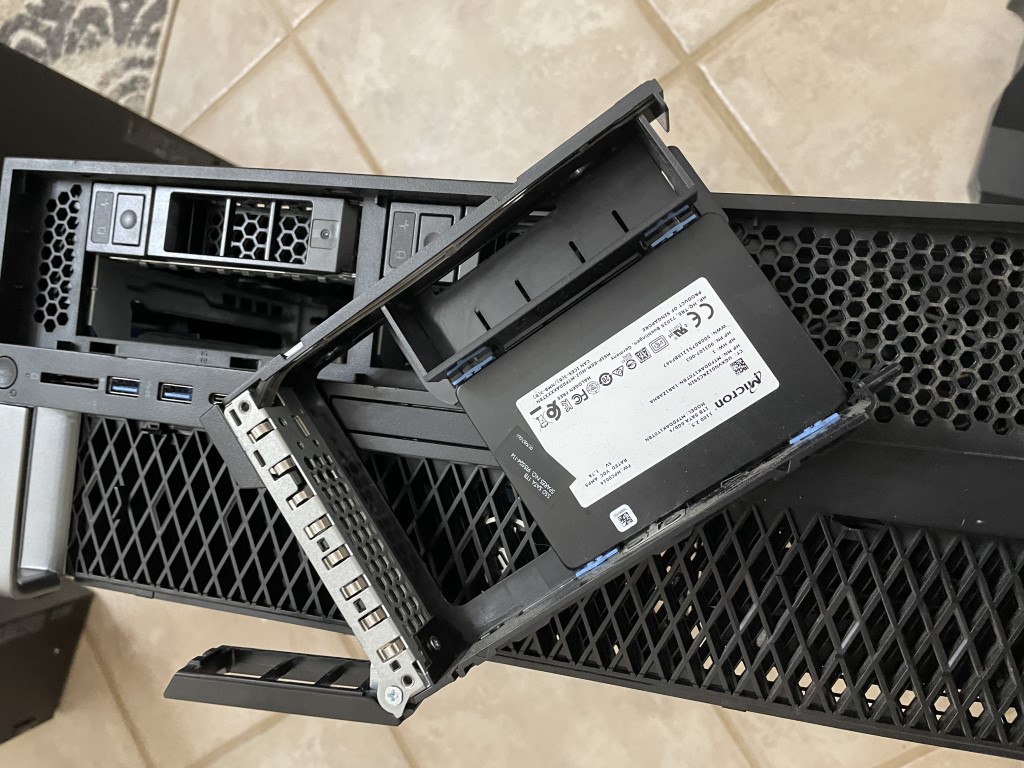
Only one drive sled populated with the SATA 1TB SSD for boot purposes.

I’ve moved the systems into my office and temporarily setup the networking using my Ubiquiti UniFi 10GbE Aggregation switch to 4 10GbE UniFi Flex switches which will provide the connectivity to these systems. The Aggregation switch is connected via fiber to my UniFi UDM-SE which handles the inter-VLAN routing and network firewall along with 1GbE Symmetric FTTH internet connectivity.

So that is the unboxing. At this point they will live for a little while in a temporary location at the side of my office. I’ll likely connect them to the TV and use it to step through the installation of ESXi and the basic network setup for vSphere 8.

Looking forward to this next part as it has been a while since I’ve physically done an install where I can actually put my hands on the keyboard/video/mouse and not use a remote KVM solution like iDRAC. Till next time!

Oh wow! It’s been a long long time

So I’ve had some changes in work life since I last did any blogging. Last time I did anything with this blog I was working as a Solutions Architect for a National Solution Provider. Along came the pandemic and instead of being on the road much of each week I was at home like the rest of us. I was on Zoom calls all day long. I had issues getting new hardware for the rest of the family and I scavenged my vSphere 6.x Intel NUC 3 node lab to used for other machines for myself and family members to use. Thus no home lab of any sort since March of 2020.

Then in August 2020 I left that role to take on contract work for the VMware Hands-on-Labs team. I was specifically working with the Certification and Education teams putting some scripting skills to use on multiple of the VCAP Deploy exams. This was a lot of fun! I really appreciated all the things I got to do with that team and all the things I learned and refreshed by having so much hands on with vSphere/vCenter, NSX, Horizon and other products. Sadly in August 2021 my contract was coming to an end. About that time I was able to interview with Matt Vandenbeld and the Success360 Customer Success Architecture Enterprise team. I started working in that role helping customers achieve greater use of their existing VMware products and realize their business goals. The team I was with covering the various business use cases was composed of total VMware Rock Stars.

There was something missing though. While I recognized I was having success in helping customers with their business outcomes my roots of working on the pre-sales side of things kept gnawing away inside me. I wanted to get ahead of helping customers fix problems after they owned product and help them find the new solutions in the first place. Early in 2023 I learned about an open role in the Cloud Solution Architecture team for the Americas. I interviewed with Mark Meulemans and quickly in the middle of March 2023 I transitioned back into a pre-sales role as a Staff Cloud Solution Architect for OCVS (Oracle Cloud VMware Solution). This role was going to cover both North and South America helping customers move to a VMware Cloud solution running in Oracle Cloud Infrastructure (OCI) and helping them take a step towards Multi-cloud.

During the transition to this new role it became obvious that I really wanted to get a home-lab back up and running. I knew I should apply the same business use case/business outcome focus to my home-lab decision and that there would be a period of research and outlining what I wanted to accomplish. With a list like that I could outline what was needed and then determine a good budget that would also meet with the “Wife Acceptance Factor” that is nearly the same as going to the C-suite and asking for funding on a project.

List of Desired Outcomes:

  • Current vCenter/vSphere 8 compatible – I want to be able to work with the current VMware enterprise flagship product
  • Ability to run VSAN and especially VSAN 8.x ESA – the ability to learn and play with the newest HCI product will allow me to work with customers who are looking to migrate from older versions and to help me work through the needed requirements that they would need in their environment
  • Ability to run NSX-T. Security is always in the forefront of any solution I want to use and I know that many of my customers will be using NSX in order to stretch VLANs and also provide distributed firewalls in their environment
  • Quiet – while this isn’t specifically tied to any business outcome or type of project having a quiet home-lab is very needed as I don’t have a separate space (basement or network closet) to put the equipment into.
  • Not overly large – for much the same reason as above having smaller equipment that does not require a rack or other large space is very helpful.
  • Power – I’m using my home circuits and don’t plan on running 220v L6-30 circuits into my office.
  • Connectivity – Having 10GbE or greater will allow me to test some new functionality of my local ISP. I’m currently on a 1G symmetric fiber connection. My neighbor is the fiber plant manager and has asked if I can help test an upcoming release of 2.5G and eventually 10G symmetric connections. Additionally having higher speed connections works with the above point on VSAN and also with connectivity back into the Oracle OCI and OCVS environments.
  • Testing OCVS connectivity and setup – Given that I am working in the OCVS environment having a working home-lab that can mimic some of the same types of workloads that my customers have will be essential in demonstrating the functionality of the solution.
  • Testing HCX migrations and network extensions – Same point as above.
  • Having enough CPU, Memory and Storage to be able to run nested vSphere environments – This is a future idea in order to mock out some scenarios that will be much larger than what I have access to. While I could use some other internal resources to do this I would likely to have to share an environment like this with others. This was I can take time to build/destroy as needed.

Research

I started my research with what it would take to run VSAN 8.x ESA. There are some basics that “should” be adhered to in getting a system that would support ESA. The easiest and best was if you are designing a Production and VMware supported environment is to consult the VMware HCL. In addition there are a number of tested ReadyNode solutions that will work. The basic requirements for ESA though are systems that can support vSphere 8, have at least 512 GB of memory, a minimum of dual 25GbE network cards, and four NVMe drives that can support extended Read and Write usage. I’m sure there are other items that I’ve forgotten to list and that some helpful people will point these out in the comments.

But this is a home lab. Right now having 25GbE is overkill. And I’m going to start with a lower number of NVMe drives and see if I can get things running and if not I’ll add additional hardware and scale things up. During some of my reading and seeing that people like William Lam had successfully run VSAN ESA on Intel 13th generation NUCs gave me home that some of these numbers were needed for Production environments and that I should be able to use lower specifications.

Next thing I researched was which CPU family, AMD or Intel? Both have processors that are on the list of compatibility with vSphere 8. I kept running into the issue that many of these processors would have cost in excess of $500.00USD per socket and I was hoping to have at least four (4) hosts and if possible have these as dual processor hosts. This would have brought the cost to over $4,000.00USD for just the processors in a home lab. Then adding in a supported motherboard. There are a number of these that I was looking at. I was very focused on the SuperMicro X12SPI-TF as it had the capability to run the types of Intel processors I was leaning towards and could handle large amounts of memory and PCIe cards. The drawback was that it was a single processor motherboard. I also looked at the ASUSRock line of motherboards. In most cases any of these boards would have run at least $500.00USD which when added to a single processor kept me in the $4,000.00USD price range. Plus having good CPU coolers is essential in with these new high end processors.

Then there was memory, networking, storage, case and power to consider. Networking I could find Intel X540 dual port 10GbE cards running for approximately $100.00USD and there are plenty of inexpensive 1 or 2TB SATA SSD drives for installation/boot drives on the market. Memory for the newer motherboards and CPUs was typically DDR5 and the costs of having 256GB per host was cost prohibitive. I’ve forgotten how much it was running but I wasn’t wanting to take out a loan just to get a home-lab. That left case and power. I hadn’t looked at cases in a long long time. I did not realize that everyone doing any of these types of builds wants to have them be able to be LED lit with the ability to change colors and have programmable actions with their case fans.

Conclusion

All of these problems sent me scurrying back to the vExpert list to see who else was doing something similar. I knew that there were multiple people who were working on home-labs out there and I’d at least see how others were tackling this. It seems that it breaks down into about four camps. There are those who are repurposing used servers and installing these into home racks or stacking them in a closet or basement somewhere. Then there are the micro-lab group: this group has gone small and tiny with low power cost but also limited on the types of processors, amount of memory and lack of expandability due to extremely small form factor (think Intel NUC line of products). The next group are taking the path of what I outlined above with finding CPU, motherboard, memory, networking and storage and putting these together into a case. Lastly there was a group who were reusing high end tower workstations that had good processing and memory capability but generally were not considered servers. As I read up on this I came across Matt Mancini’s vmexplorer.com blog. Matt had recently gotten some Dell Precision 7820 workstation towers for his home lab. After looking at what he had gotten I started searching e-bay and other sites for these beasts.

What I finally found was a company that had a business in Michigan and had a real storefront and sold via their online store or on e-bay. After talking to a real person here is what I ended up ordering from PC Server and Parts:

  • Quantity four (4) Dell Precision Tower 7820 Workstation
    • Processors: 2x (2.20 GHz) 10-Core Intel Xeon Silver 4114 Processors
    • Memory (RAM): 384GB (12x32GB) DDR4 2133 MHz PC4 R Memory
    • Storage:
      • 1TB SSD SATA 6GB/s 2.5″ Solid State Drive
      • M.2 Storage: 2TB M.2 NVMe Solid State Drive
      • HP Z Turbo M.2 Adapter Card
    • Graphics Card: Nvidia Quadro K600 1GB DDR3
    • Network: Intel X540 Dual 10GbE network card

Over the next bit I am going to document the unboxing and setup of these systems to run vSphere 8, vCenter and how I get VSAN ESA up and running. As I gradually get things setup in my home-lab I hope you follow along. I’d love to hear about your home-lab and what you are using it for. Look forward to part 2 where I get into the fun part with installation and setup.

VMworld 2018 Tips and Tricks

Bringing back a previous post and adding to it.  There are a few things to cover: (A/C and room cooling, hydration, walking, scheduling, community, packing and swag).

A/C and room cooling

First and foremost close the drapes on your room.  Remember you are in the middle of the dessert and in the hottest days of summer.  Block the sun from coming in while you are out of your room!!  It just makes sense. Secondly I am copying from a previous post I did last year on helping to really set your room’s thermostat.  Follow the instructions below:

Setting the room thermostat to VIP mode which allows you better control on your room A/C system.

  1. Hold down thee Display button. Keep it held down till the end of the proceedure.
  2. Press the Off button and release it.
  3. Press the Up button and release it.
  4. Now release the Display button.

This should put your thermostat into VIP mode and allow you to get your room temp down to a cooler temp if you like it that way. When I am in Vegas especially during the summer for shows like VMworld I can never get enough cool air around me. So far this seems to work.

Hydration

Again remember you are in the dessert in the middle of summer.  Even if the conference feels cool due to the extensive A/C systems running full blast your body will lose water!  Drink plenty of fluids.  This means not just alcohol based fluids but fluids that will replenish your body’s need for H20.  Think about bringing powdered Gatorade or other sportsdrinks and mixing them up onsite with the available water bottles.  While it is tempting to drink in the evening parties don’t forget to drink at least an equal amount of water to help your body detoxify over night.  You can easily end up with a headache and it may or may not be alcohol related.  Remember if you can’t concentrate or have a headache drink water.

Walking

I know of people at VMworld who easily hit 40K+ steps per day.  Wear comfortable shoes.  Do not bring brand new shoes!  Have a change of shoes and have plenty of changes of socks.  It may not be a bad idea to pack some band-aids or other bandages in case of the dreaded blisters on your feet!  I also know that some who shall remain nameless even go so far as to wear their compression socks to keep the swelling down to a minimum while on the expo floor.

Scheduling 

It is easy to fill your entire VMworld Schedule Builder up.  There is absolutely no way to do everything.  Many of the sessions are recorded for playback later.  Make room for time to walk the expo floor.  Make time to have conversations at breakfast and lunch.  These conversations lead to those hidden gems of a conference.  Things you won’t learn anywhere else but at a table you shared with a product manager or a developer of a new product.  Make some time for yourself too.  Maybe a 10-15 minute power nap in a beanbag chair in the VMTN Community area?  Sometimes that is exactly what you will need to keep going.  Don’t be afraid to drop sessions and add new sessions as the event goes on.  If something looks interesting and the Schedule Builder shows it is full and waitlisted go hang out at that  Session/Breakout and see if they end up with room for you once it starts. Make some time to visit the HOL.  If you don’t know what the HOL is ask!!!  It delivers more VMs in a day than many of us will in our lifetime.

Community

Stop and talk.  Offer to help find a location!  We are all 25K+ of the best community anywhere!  Ask a #vExpert in the VMTN area about their blog or what they are tweeting about.  Ask someone what their favorite session is?  There is a new 2018 #vTrailmap that will be out.  There are folks with stickers and cards.   Come see me I may still have some around once things get going. I mentioned sit at random tables during breakfast and lunch and meet new people. Follow @VMworld and @VMTNCommunity and @VMwareCode on twitter.  Ask!  Don’t be afraid some of the best support sessions happen through rapidly evolving crowdsourced twitter responses.

Packing and swag

I pack enough shirts to be able to change out for the evening events.  I get tired of wearing the same stuff all day for 18 hours a day.  I pack extra socks and shoes too.  I try to limit the amount of stuff I pack around in my backpack all day too.  And I generally bring an old ratty backpack and toss it while there.  This is due to the fact that generally the VMworld backpack is pretty decent quality.  I limit the amount of literature I bring home from vendors by taking pictures of the marketing slicks and then tossing them.  I do pack a collapsible bag in my outbound luggage for swag items.  I end up giving away a bunch to coworkers/customers when I come home but the number of t-shirts and other items seems to grow and I have been known to ship a bag home instead of checking it at the airport.

One last note I heard today from @WonderNerd Tony Foster is that to leave your backpack in your room for the General Session on Tuesday due to security screening concerns for the main speaker Malala Yousafzai.  This will speed up the entry into the main conference area.

Hope this helps someone!  See all y’all there!

VMworld VMTN Session – VMware Center for Advanced Learning – Advanced Architecture Course

I will be a Panelist with Daemon Behr (@DaemonBehr) discussion the very unique program of education regarding the VMware Center for Advanced Learning.  Specifically we will be talking about the new offering of the Advanced Architecture Course.  This is usually shortened to the VMware #CALAAC.  If you are attending @VMworld 2018 in Las Vegas next week 8/26/2018-8/30/2018 and have some time on Wednesday morning come visit us at the VMTN Communities area.  In the VMworld schedule builder it can be found by searching VMTN7703U.  Here is a shortened URL for the search. VMworld Schedule Builder Search for VMTN7703U

See all y’all there!

vExpert NSX – 2018

Honored to be included among the very smart crew of folks who champion the need for SDN on the VMware NSX-v and NSX-t platforms!  Such a great team of people and always great to work with the NBSU at VMware (@VMWareNSX).


I love having NSX discussions with folks.  If you want to connect hit me up here on LinkedIn or on twitter @VirtSecurity.

At @ConnectionIT I am able to work with another fine VMware vExpert @MBLeib who also happens to be a VMware vExpert NSX member also.  If you haven’t gotten the understanding about what NSX and SDN can do for you ask your @ConnectionIT Account Manager to reach out to one of us.

I get excited to imagine what will be released next week while at @VMworld in Las Vegas.  I hope there will be further information on how NSX/SDN will be used in systems like #IoT and even down to endpoints with products like AirWatch.  Eventually we all will have to move off rule based firewall systems and onto policy based engines that will work throughout our corporate infrastructure no matter where we are connecting from.  Sometimes we just get focused on just the Data Center or even the edge of the Data Center and the DMZ where the largest amount of attacks happen but we need to look holistically into where all the traffic moves and most of this is East/West bound in between our VMs inside the rack servers/blade servers/HCI/converged infrastructure.  If we don’t how will we react not just when or if a breach happens or even more likely a badly configured application/buggy app is let loose.

Let’s keep the discussion going!

Here is a list of the other VMware vExperts for NSX.

https://blogs.vmware.com/vexpert/2018/08/17/vexpert-nsx-2018-award-announcement/


7th year as VMware vExpert

Very happy and humbled to be included in this group for the 7th year as a vExpert. I love talking about all things virtual.  Thanks to the VMware @vExpert team and the @VMTN team and the VMware Communities folks.  Also glad to be joined at @ConnectionIT to have fellow vExperts Tony D’Ancona (@IT_dancona) and Matt Leib (@MBLeib) on the team with me.

Since the vExpert 2018 logo hasn’t been released yet I made my own with 7 stars for my 7 years.

#VMWorld #vExpert #vmtn please donate extra trade show shirts to #HarveyRelief

So I had an idea last night that could help a lot of people out. South and Southeast Texas got hit hard with Hurricane Harvey right as VMworld got started. Cash and eletronic donations are awesome.  But what about the useable swag we get and is left over from the vendor booths? Much of it can get thrown away.  

Please if you are a vendor consider giving your unused shirts, bags, etc to a reilef organization to send to Harvey victims.  It will be months before things even get to a semblance of order there.   They will need all types of items and I know the @VMware community and #vExpert and @DellEMC and @HPE, @Cisco and all of the major vendors can pull together to help people in such need.  Isn’t fixing problems the reason many of us got into IT in the first place?

I know as soon as I get back and am allowed to go into the area I will be taking my chainsaw and other tools to go help with disaster relief.  What can YOU do?!?!?,